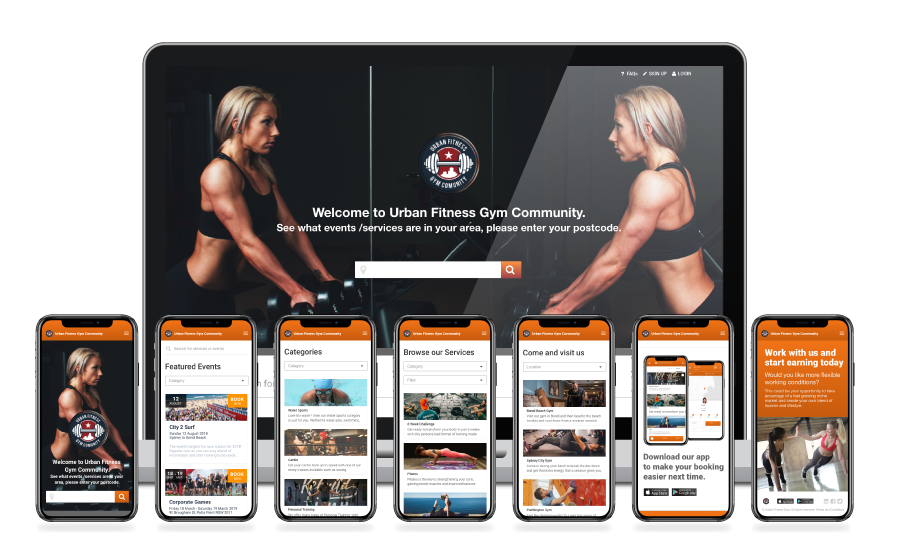
Setup your Customer Portal and Accept Online Bookings through your Website
Introducing the OctopusPro Customer Portal: A Comprehensive Solution for Streamlined Service Management
The OctopusPro Customer Portal is an all-in-one, mobile-friendly platform designed to simplify service management for businesses of all sizes and industries. With its easy-to-use interface and powerful features, the Customer Portal allows your clients to view your schedule in real-time, obtain accurate quotes, book services, make payments, and much more. By seamlessly integrating with your website, social media networks, and directory pages like Facebook and Yelp, OctopusPro enhances your online presence and maximizes customer engagement.
Key Features:
-
Real-Time Schedule and Availability: The Customer Portal displays your up-to-date schedule, enabling clients to quickly find and book available time slots for your services.
-
Accurate Quotes: Clients can generate precise quotes based on your pricing structure and service offerings, streamlining the booking process and minimizing confusion.
-
Secure Payments: The Customer Portal supports secure online payments, making it easy for your clients to pay for services directly through the platform.
-
Customization and Branding: Personalize the look and feel of the Customer Portal by choosing colors, adding your logo and imagery, and integrating it with your existing website or using it as a standalone site.
-
Social Media Integration: Connect your Customer Portal with popular social media networks and directory pages to increase visibility and reach more potential clients.
-
Flexible Booking Management: OctopusPro supports various booking scenarios, including multiple addresses, fixed-site locations, and virtual services, making it suitable for a wide range of industries.
-
Team Profiles and Availability: Manage your team’s profiles and work hours, ensuring that clients can book services with the right fieldworkers based on their expertise and availability.
-
Job Assignment and Tracking: Assign jobs to fieldworkers, monitor progress, and keep clients informed about the status of their bookings.
-
Forms and Checklists: Create custom forms and checklists to streamline your workflow and ensure consistent service quality across your team.
-
Customer Feedback and Ratings: Collect valuable feedback from clients and monitor your team’s performance through ratings and reviews.
-
Discounts and Offers: Attract more clients by setting up special discounts and promotional offers through the Customer Portal.
By integrating the OctopusPro Customer Portal into your business, you can streamline your service management processes, enhance customer satisfaction, and boost your online presence. Experience the benefits of a comprehensive, easy-to-use platform that caters to the unique needs of your service-based business.
Table of Contents:
- Which type of business is OctopusPro suitable for?
- How to set up your customer portal?
- Integrate your website with OctopusPro
- Flags & permissions
- Payment & accounting integration
- Setting up Services
- Manage your team profiles and availability
- Job Assignment
- Forms and checklists functionality
- Customer feedback and ratings
- Discounts & offer settings
- Customer portal | Use case
Which type of business is OctopusPro suitable for?
Whether you run a business providing services at your clients locations, or you provide services at your business location as well as at your client’s home or business address, or Virtual through voice or video calls, you can benefit from the OctopusPro customer portal.
OctopusPro’s powerful Booking Management easily handles service bookings that require multiple addresses, like a pickup and destination or drop off address, your customers can enter these addresses when making the booking.
This feature is useful for Shuttle Services, Delivery Businesses, Removalists, Skip bin services, and more.
If your business provides services at one or more fixed locations, your customers can choose the location most suitable to them.
If you provide virtual, or online services, your customers can choose their region or time zone before starting the booking process.
OctopusPro is used in various industries
The OctopusPro Customer Portal caters to a wide range of service-based businesses, including:
- Mobile service providers: Mobile mechanics, beauty services, vets, tutors, and cleaning businesses.
- Fixed-site service providers: Beauty salons, massage studios, and car wash shops.
- Virtual service providers: Online education services, technical support, virtual assistance, and consulting services.
Regardless of how you offer your services, OctopusPro provides all the tools you need to run your business, and the features required to help you grow your business smoothly while staying in control over your business operations, whether scheduling a mobile mechanic for a regular service, booking a massage at the studio, or booking and scheduling education services online.
Your OctopusPro customer portal enables customers to generate quotes, book your services, cancel and reschedule bookings, make payments, track bookings, sign for work, communicate with your office and fieldworkers, and rate their jobs once completed.
 Your mobile-friendly customer portal can be easily customized and even integrated directly with your current business website.
OctopusPro makes it possible to receive inquiries and leads directly from your website, easily convert leads to quotes and bookings, invoice and take payments, track and pay fieldworkers, send notifications and messages to customers and fieldworkers, manage communications and job updates, manage feedback, and much more.
How to set up your customer portal?
To get started, go to Settings > Communications > Customer Portal.
Customer portal Settings
- General Settings
- Flags and permissions
- Branding and style
- Home page promotions
- Social networks
General settings
You can use general settings to administrate the below:
- View your portal URL
- Select portal languages
- Add booking disclaimer
- Add privacy policy
- Setup SEO, Google analytics, Google Adwords and Facebook pixel code
- Select payment methods to display
View portal URL
When you click on the generated portal URL, you’ll be able to view your portal looks without any customization or services added.
OctopusPro provides the option to edit your customer portal URL, or “booking portal” URL by simply clicking on Edit portal username then adding your business name and Save.
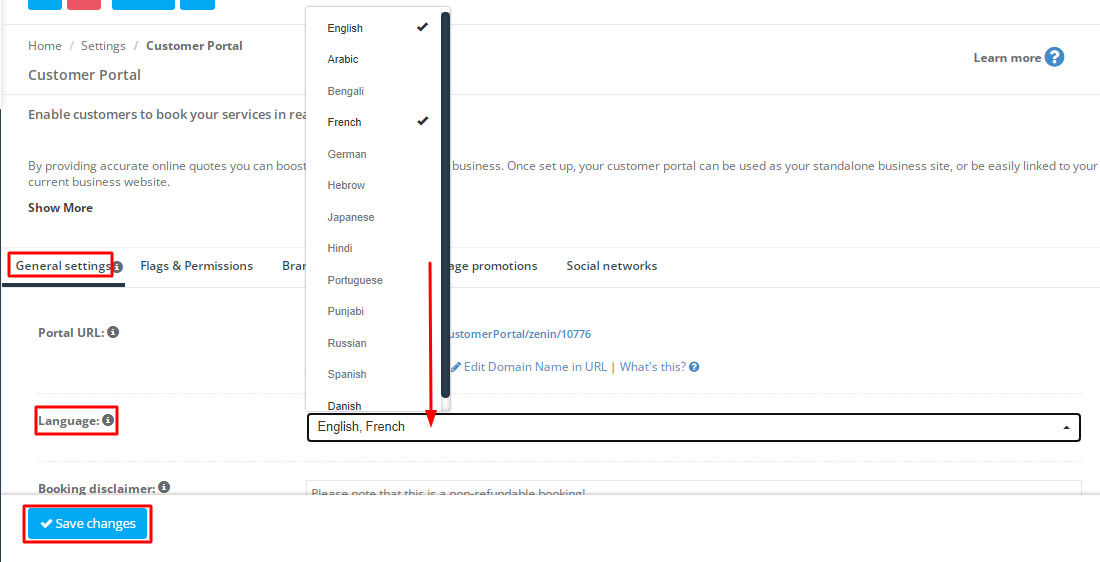
Select portal languages
Reach larger targets, and communicate better with your customers by providing a multi-language portal. You can choose to display your platform in various languages, such as French, Danish, German, Arabic, and more.
Select from the list your preferred language/s, and let your customers choose their spoken language while on your portal.

Add booking disclaimer
The disclaimer or statement your customers need to see before confirming the booking could be related to payment terms, travel conditions, booking timeline, or any special conditions your customers need to be informed about before placing the booking.
This text will appear on the confirmation page once your customer has reached the end of the booking process.
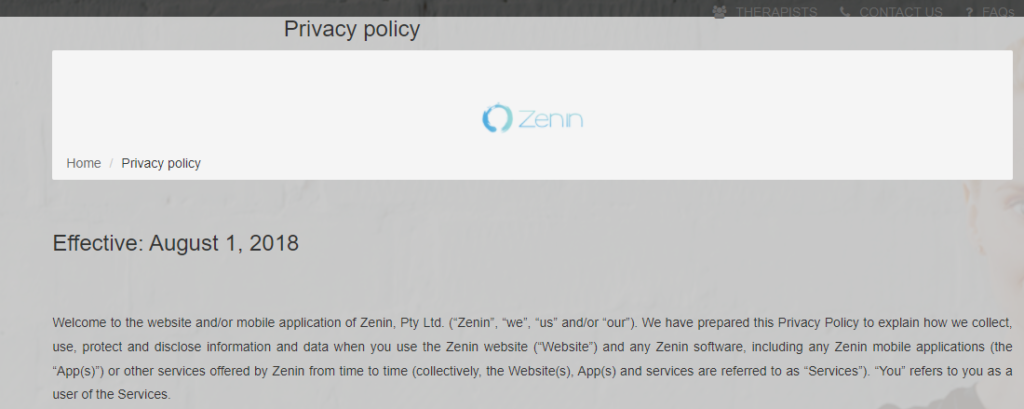
 Privacy policy
You can add your privacy policy using the HTML editor as displayed below:

Setup SEO, Google analytics, Google Adwords and Facebook pixel code
You can edit the page meta title and add a meta description, which is your business headline and description displayed by Google in web search results.
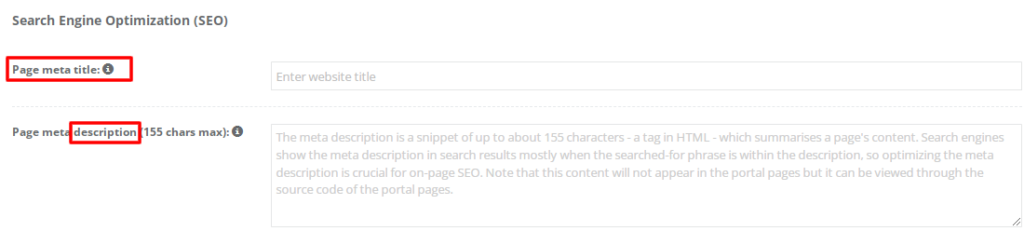
For more info, please visit Search Engine Optimization (SEO)
You can add your google analytics tag, for tracking important customer analytics.
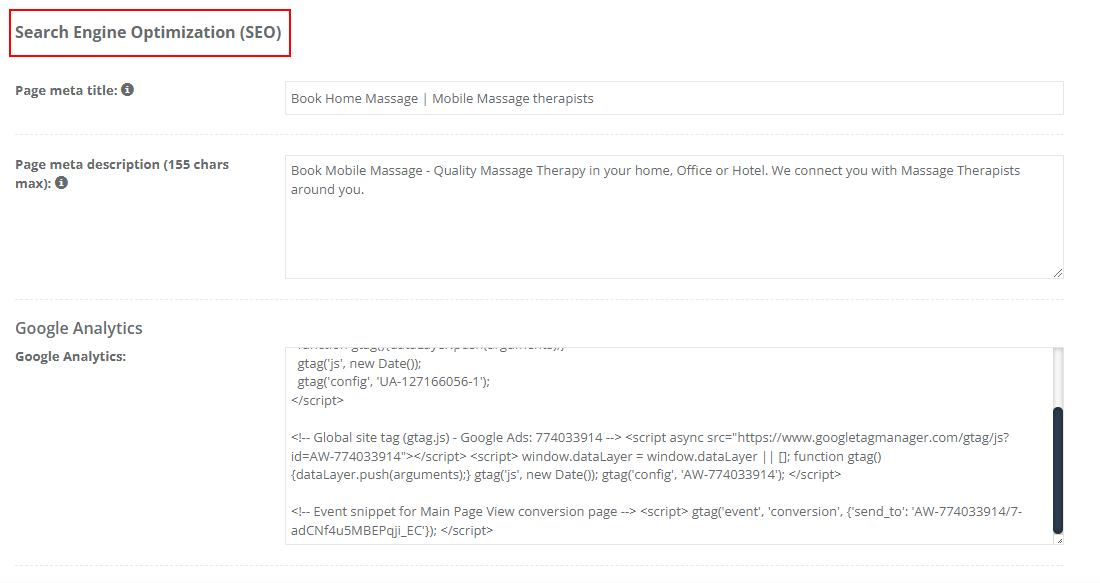
For more info about Google Analytics, please visit Google Analytics
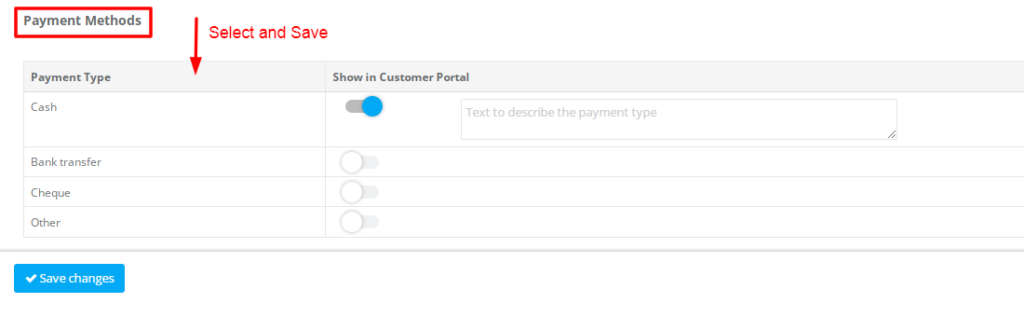
Payment methods
You can select your preferred payment methods to be displayed on your customer portal.
Integrate your website with OctopusPro
By integrating your website with OctopusPro, customers can book and pay for services directly. Their customers are also able to send inquiries through the website if they aren’t ready to book just yet, which appear in the OctopusPro inquiries tab for the company office staff to follow up on.
The OctopusPro customer portal also makes it possible for customers to sign up for an account, and log in to their own accounts on your website, where they can self-manage their bookings, payments, and profiles.
OctopusPro allows you to add links to your website that point to different pages in your customer portal directly. For example, you can display or hide your fieldworkers list, your fieldworker profiles, your terms & conditions, privacy policy, and “about us” pages. You can also display your “contact us” page and include an inquiry form to funnel leads directly into your OctopusPro account.
Branding & Style
The portal is fully customizable, you can add your company logo, change the color scheme or even apply different schemes, allow social login, and store customers information for returned customers.
How to customize the color and text of your portal?
How to make your contact form look cool?
How to add a logo to customize the portal and invoice and quote templates?
How to customize the color and text of your portal?
You can use custom styles to tailor the look and feel of your portal to match your company branding. This can be slightly technical but provides a lot of flexibility and control.
Admin users will have access to personalize their customer portal to match their company branding. Customization will be divided into several sections, allowing you to edit and review each part of the page.
To add branding & style to your customer portal, please follow the below steps:
- Login using your admin user account
- Navigate to Settings> Customer portal> Branding & Style
- Make the desired changes then Save.

How to make your contact form look cool?
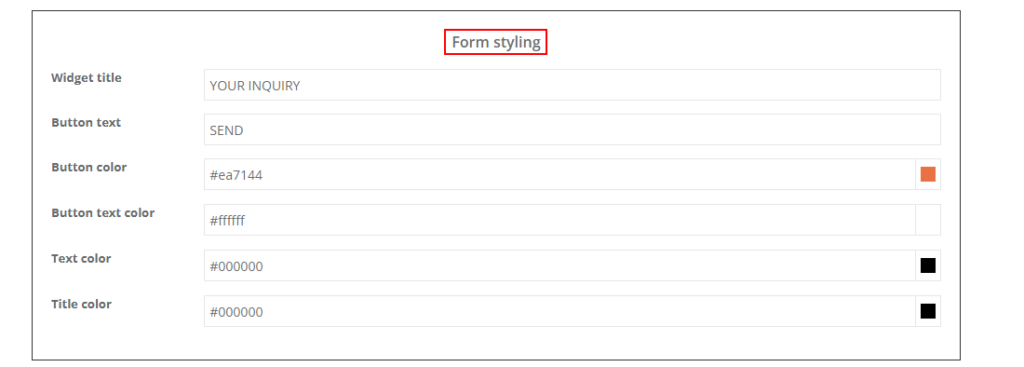
You can customize the form fields, labels, styling, and color of your inquiry form in your inquiry widget settings. You may visit Inquiry Widget Setup and Integration – Octopuspro for more info.

How to add a logo to customize the portal and invoice and quote templates?
To add your company logo to your customer emails and invoices header, select Settings in the menu, followed by Company Settings and Branding.
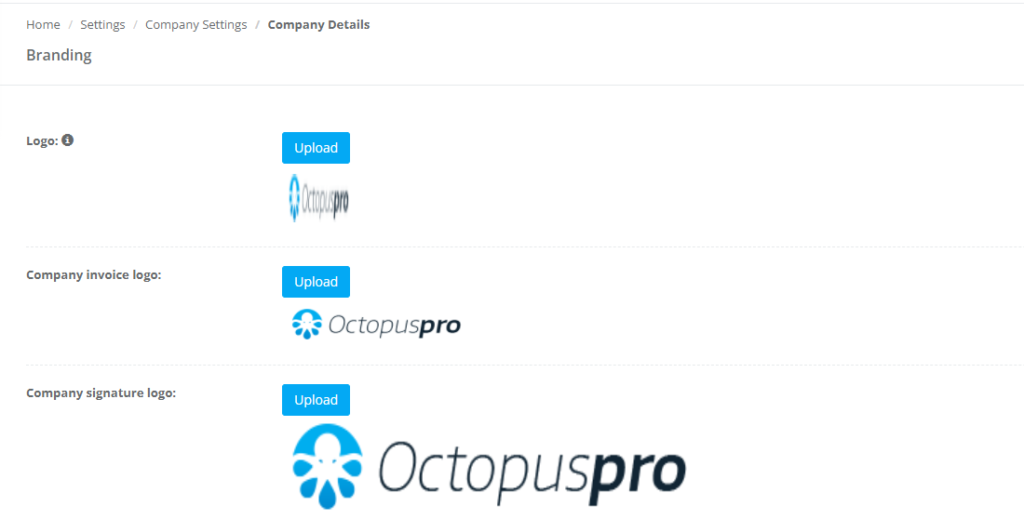
Adding your company logo to customer correspondence is a simple matter of uploading your logo under the respective category, so here you have a logo, company invoice logo, and company signature logo. The last option under company details is for adding a tagline to the login page of your customer-facing app, included with the OctopusPro corporate package.
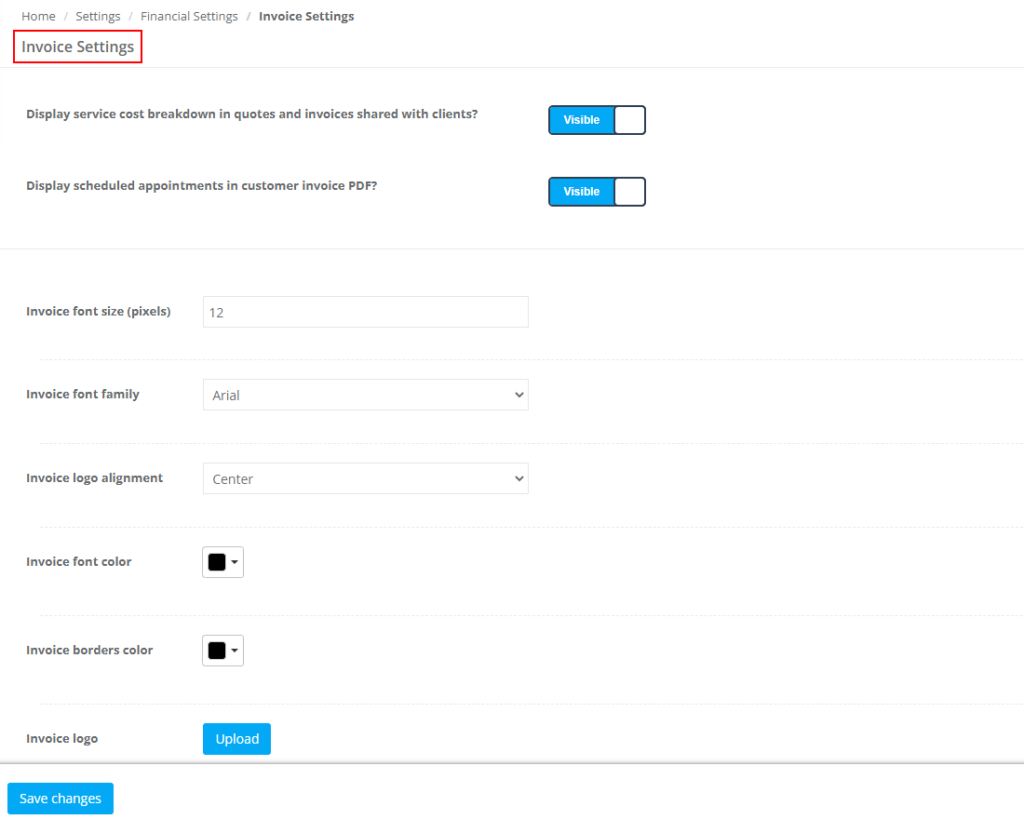
You can further customize your invoice template from your Invoice Settings page under your financial settings.

To learn more about how to customize your portal Branding and style click here.
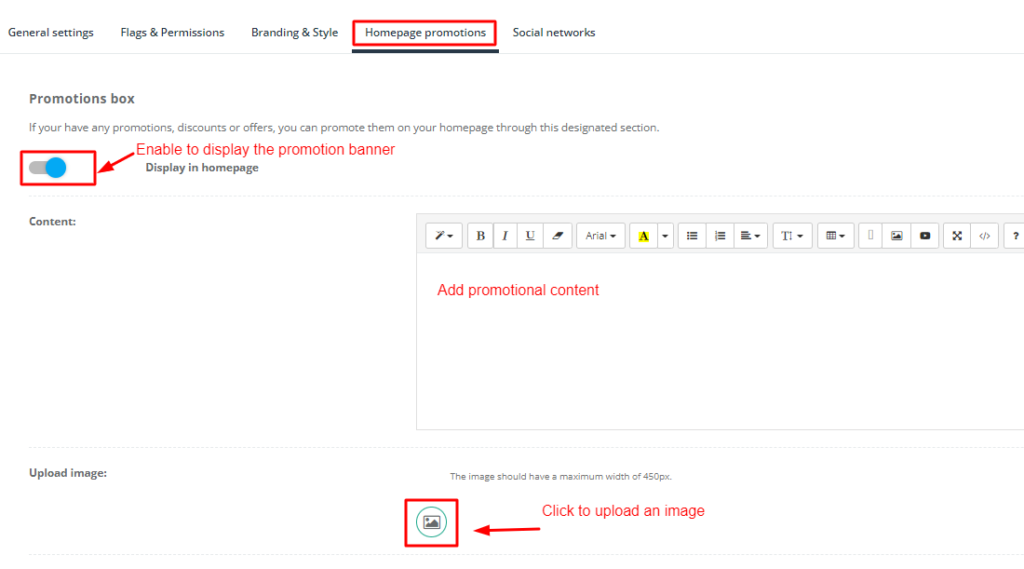
Homepage promotions
OctopusPro allows you to add a promotional banner to display any promotions, discounts, or offers.
To enable the promotion box, navigate to Settings> Customer portal> Homepage promotions, then enable the flag as displayed below:
Once you add your promotional content and image, click Save and you’ll be able to view your promotion on your customers portal homepage at the bottom.

For more info, please visit Customer portal homepage promotions
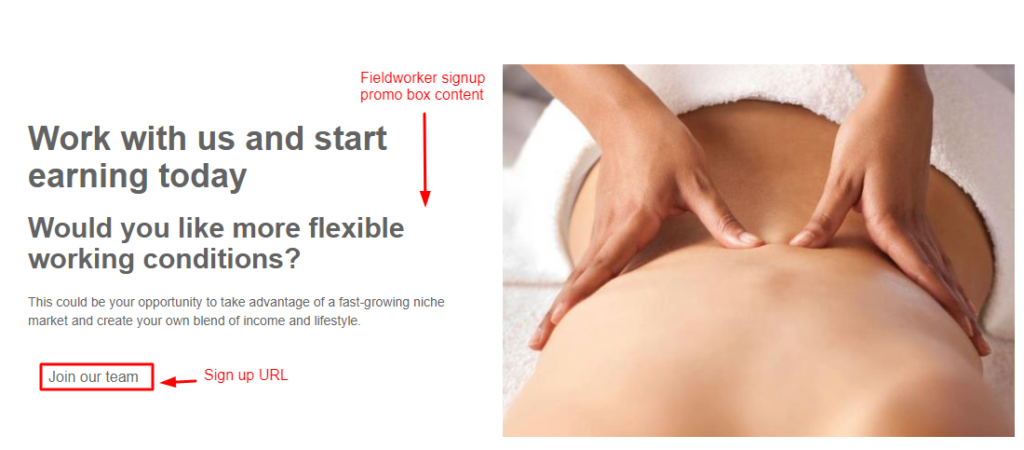
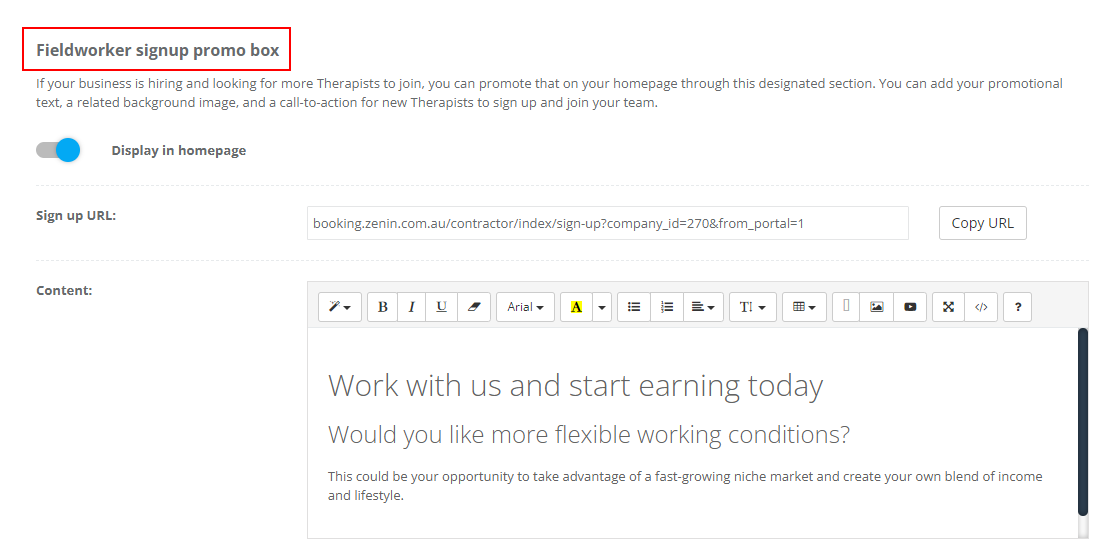
You can also enable the fieldworker signup promo box as displayed below:
If your business is hiring and looking for more Fieldworkers to join, you can promote that on your homepage through this designated section. You can add your promotional text, a related background image, and a call-to-action for new Fieldworkers to sign up and join your team!
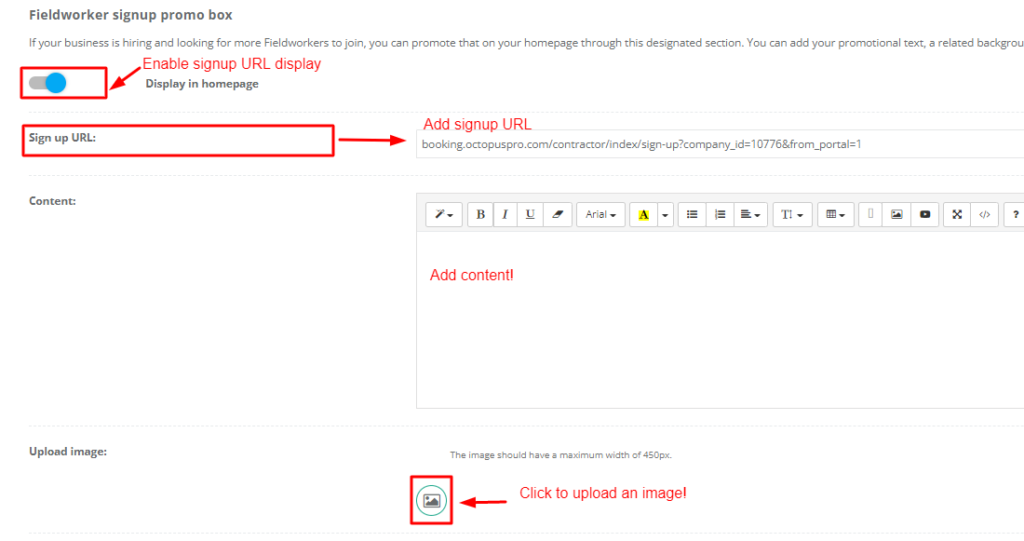
For more info, please visit Fieldworker Sign-up promotion
For more info about Join our team feature, please visit Fieldworker | Join our team feature
You can also add your Branded app info as displayed below:
If your business has its own app, you can promote that on your homepage through this designated section. Add the links of your Android and IOS apps, and they will appear as Google Play Store and Apple App Store icons that will direct customers to download your app. You can also add a call-to-action text and an image to promote your branded app to this section. Use the toggle to hide or display this section on your customer portal homepage.
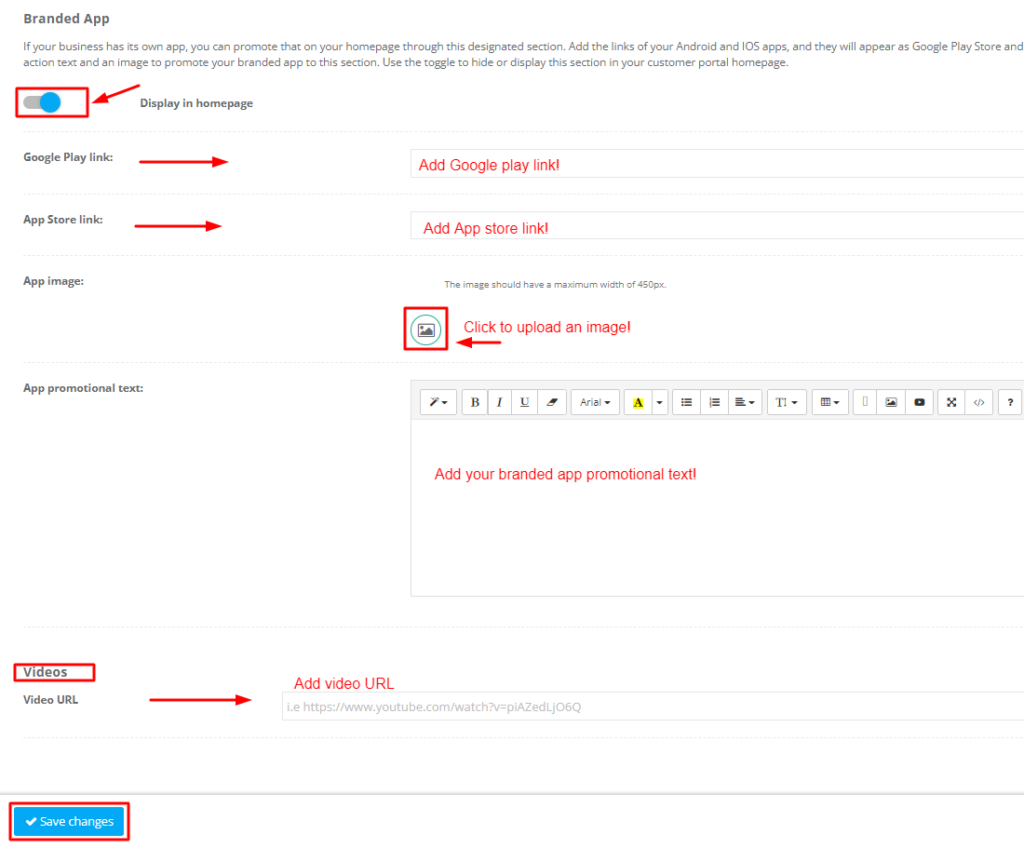

For more info, please visit Display your Branded App on your Customer Portal
Social networks
If you add links to your social networks, clickable icons will appear at the footer of your customer portal. Adding links to your social networks allows your customers to visit your social media pages like Facebook, Instagram, and Twitter. To add, select the network and paste the link for your page, and click ‘Add’. You can add as many networks as you like.

Word of mouth and social media sharing is important. OctopusPro allows you to provide incentives for sharing on social media, such as Facebook and Twitter.
You can use Facebook as a marketing tool for your business by adding Facebook online booking to your marketing mix allowing customers to book directly from your Facebook page.

Once you connect your social network accounts, it will be displayed at the bottom of your customers’ portal page, allowing your customers to connect directly by simply clicking on the preferred network.

To learn more about social networks, please visit Social networks
Flags & permissions
You can set flags & permissions for your website, booking, and fieldworkers as explained below:
- Website flags
- Booking flags
- Fieldworkers flags
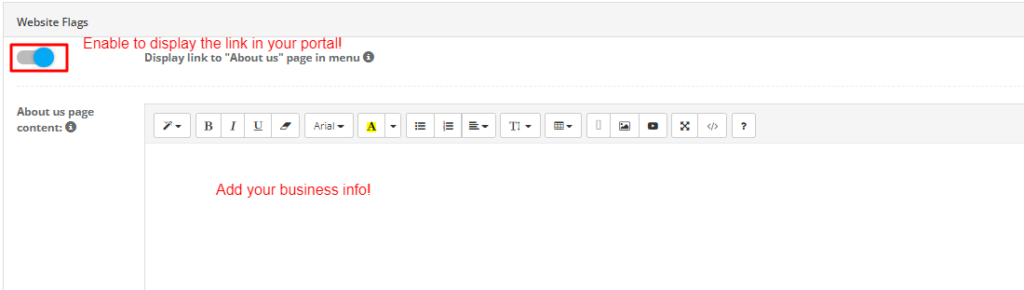
Website flags
- Display link to “About us” page in menu
- Display link to “Contact us” page in menu
- Display link to “FAQs” page in menu
- Display a search bar for services in the customer portal
- Display service description brief in the services list in the customer portal
- Display Google Reviews in customer portal homepage
- Display Phone Numbers for Customer to call in the customer portal
About us
When you enable the About us toggle, you gain access to the related text box, so that to add your business info and share your vision with your customers. For more info, please visit Display link to “About Us” page in the menu
Contact us
You can display your “contact us” link and include an inquiry form to funnel leads directly into your OctopusPro account by enabling the Contact us toggle. For more info, please visit Display link to “Contact us” page in menu

Your customer portal comes with the inquiry form page activated by default, and you can decide whether you want to display the inquiry form link in your menu. You can customize the fields, labels, and style of your inquiry form from the inquiry widget page in your communication settings.
For more info about the inquiry form, please visit Inquiry Widget
FAQs
To display a link to your FAQs page in your customer portal menu, simply enable the related toggle.

Once you enable the FAQs toggle, the link will be displayed on your customer portal. You can set the questions and answers displayed from Settings> Communications> Questions and answers
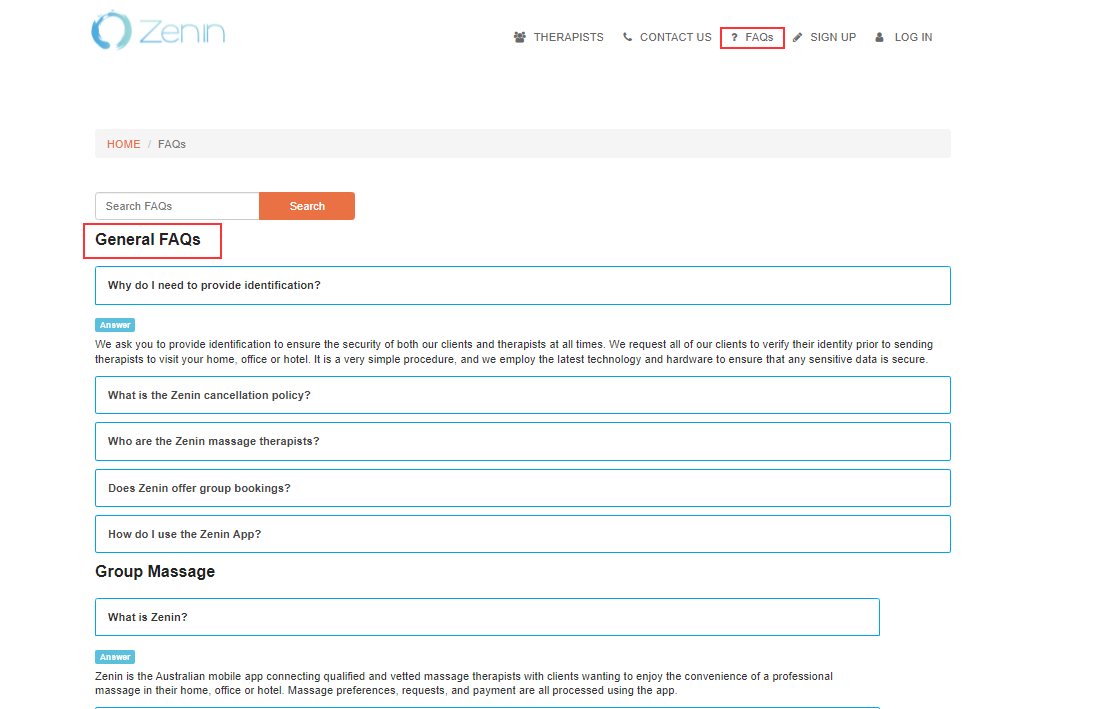
Sharing a list of FAQs helps improve your operations, ensures your customers are well-informed and prepared for the job, and reduces the chance of your customers needing to ask you these questions directly via email or phone. For more info, please visit Display link to “FAQs” page in menu
Search Service
You can activate the search services toggle so that your customers would be able to browse the desired service directly.


For more info, please visit Display a search bar for services in the customer portal
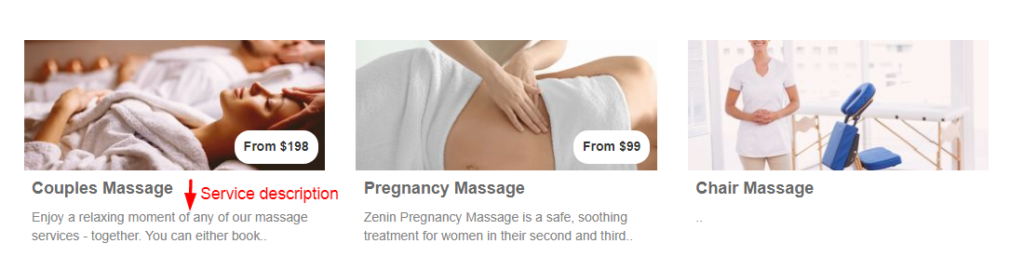
Service description
You can enable a service description toggle so that to display a brief about the service to your customers. If you didn’t enable this toggle, only the service name and image will be displayed on your customer portal.

You can add a service description while creating a new service, or editing an existing service.
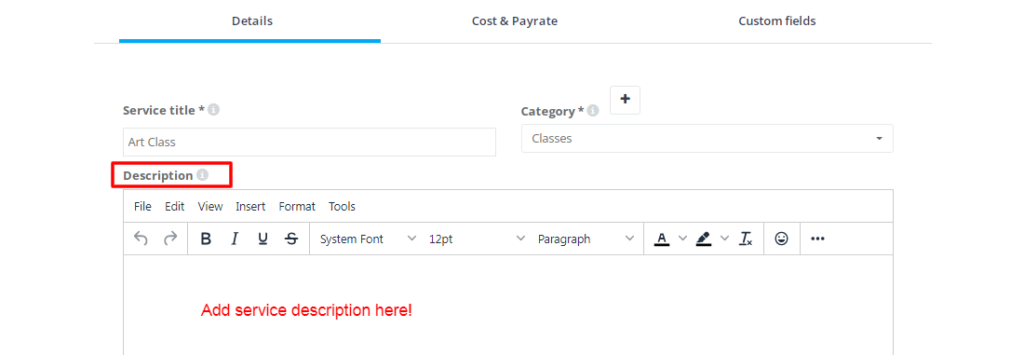
For more info, please visit Display service description brief in the services list in the customer portal
Google reviews
OctopusPro allows you to embed Google reviews on your customer portal by using an API to communicate with Google to automatically pull in review data. You can show your high appraisal from customers to help convince visitors that your products or services are trustworthy. You can also display a redirect button that leads people to your Google page where they can write a new review, which helps contribute to having more client reviews about your offers or services on Google.
To embed Google reviews on your portal navigate to Settings> Company settings> Integrations(API)
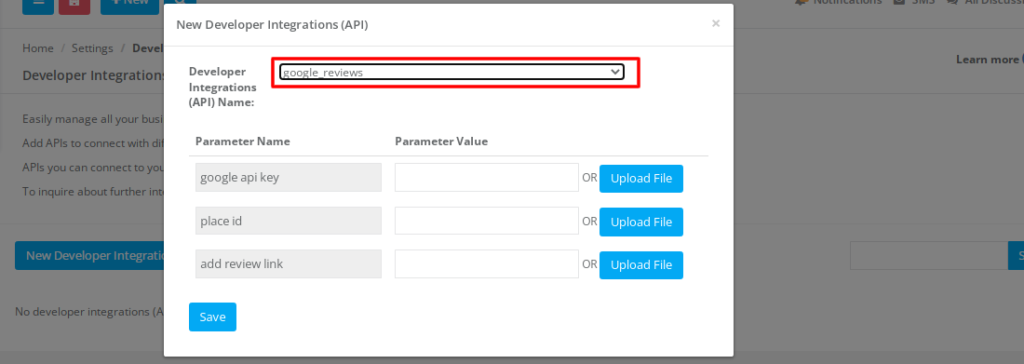
Once embedded, reviews will be displayed at the bottom of the customer portal page as displayed below:

For more info on google reviews, please visit Display Google Reviews on customer portal homepage
Display Phone Numbers for Customer to call in the customer portal
You can set up your customer portal to display your business hours and contact number so that your customers would know how and when to reach out for support by enabling this flag.
When admin users enable this flag, they can add the business hours in the box below the flag as displayed below, as for the phone number, it will be retrieved from Settings > Company settings > Business details> Primary

To learn more, please visit Display Phone Numbers for Customers to call in the customer portal
Booking Flags
You can set the minimum required notice period for any new bookings to ensure bookings are not made without sufficient preparation time. For more info, please visit What is the minimum notice time required for any new bookings?

- You can set booking time intervals. Time slot intervals determine when a client is able to make a booking. For example, an interval of 1 hour allows bookings at 1:00 p.m., 2:00 p.m., 3:00 p.m., and every 1-hour interval after that.

- You can set an address label so that it be displayed in the text box where you need your customers to add their address, such as the search service available in their area.

The address label displayed below was updated to “Show us where you are”!
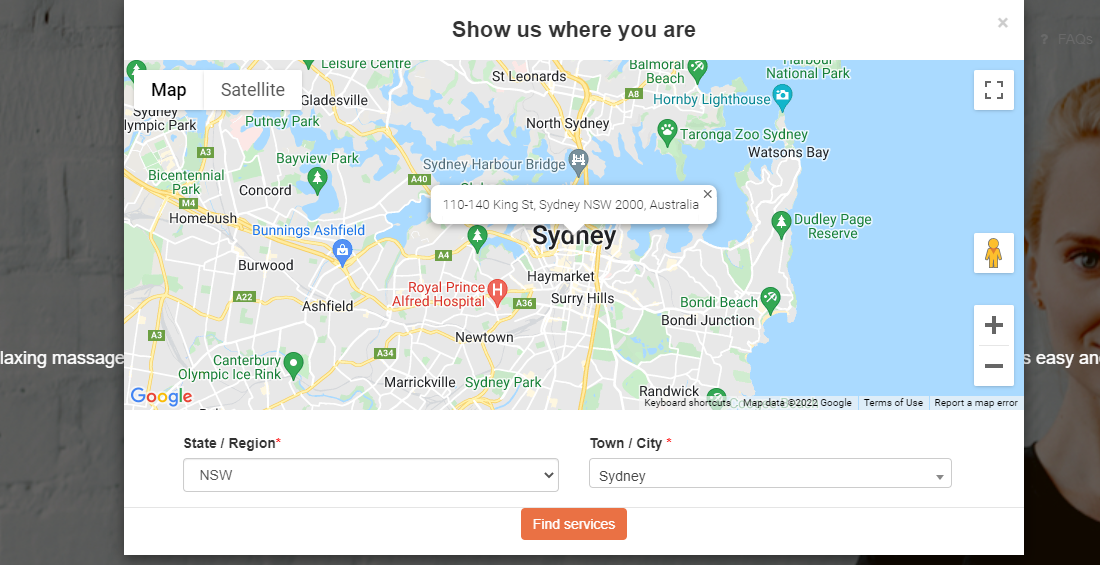
To learn more about Address labels, please visit Address label
- You can allow bookings to have multiple addresses, such as 2nd address or 3rd address as per your business needs, noting that you’ll still be able to label it as well. for example delivery address.
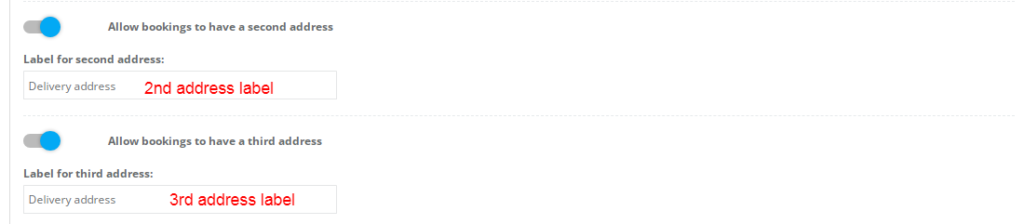
To learn more, please visit Add Multiple Addresses to Bookings
- You can enable the toggle to notify your fieldworkers about customers discussions or complaints. To learn more, please visit Notify fieldworkers about discussions
- You can enable the display Schedule an appointment button to customers on the quote booking page after their quote has been accepted.
- You can allow customers to make repeat/recurring bookings.
If you want to enable customers to schedule repeat bookings, you must first enable the flag in your customer settings. You can also control this on a service level, so if you want to allow customers to make repeat bookings for specific services only, you can edit this flag at a service level; this must however be enabled at the customer portal level.


If you have work contracts with clients where you charge on a recurring basis, you can automate payments so completed bookings are automatically charged on scheduled days.

To learn more, please visit Allow customers to make repeat/recurring bookings
- You can allow your customers to make bookings and dedicate them to a loved one by enabling the flag to allow customers to buy gift cards.
- Allow customers to select their preferred Fieldworker when making a booking. To display or hide the fieldworkers listing page in your menu, activate the fieldworkers listing flag. To learn more, please visit Allow customers to select preferred Fieldworker when making a booking


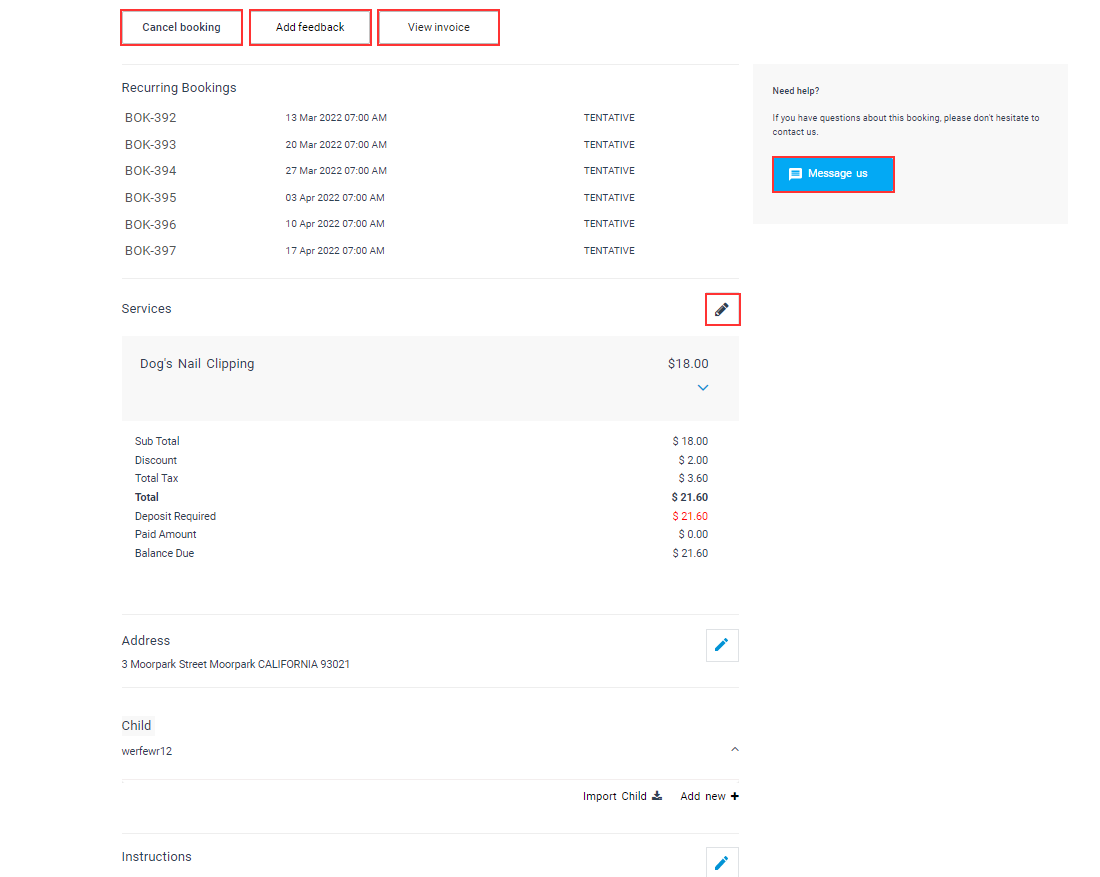
- Allow customers to cancel bookings through customer portal and email links.
You may allow your customers to cancel their bookings on their own to provide them with a positive experience represented in our properly implemented cancellation flow. Difficult cancellation process or lack of the ability to cancel for users makes them less willing to use your services again in the future.
To learn more, please visit Allow customers to cancel bookings through the customer portal and email links

- Allow minimum time required before canceling settings
You can set up a time window, which the customers can’t exceed if they wanted to cancel their bookings, to avoid last-minute cancellations which affect your business. To learn more, please visit Allow minimum time required before canceling settings
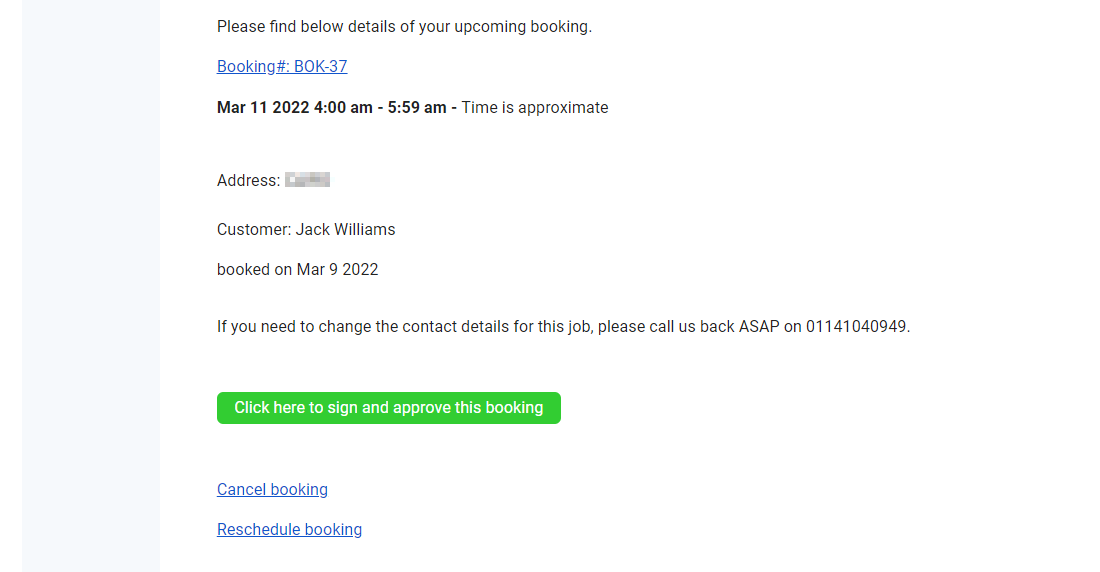
- Allow customers to reschedule bookings through customer portal and email links
You can enable this flag to allow your customers to reschedule their bookings through the booking page in the customer portal or via providing them with the reschedule link in the booking confirmation email as displayed below:

For more info, please visit Allow customers to reschedule bookings through the customer portal and email links
- Allow guests to make bookings through customer portal
You can enable this flag if you want to allow your customers or your customer portal visitors to make bookings if this flag was disabled, only logged-in customers can make bookings on your customer portal. To learn more, please visit Allow guests to make bookings through customer portal
- Allow customers to select an exact start time for their bookings
You can allow your customers to select the start time they need while scheduling their bookings by enabling this flag, otherwise, they can choose a time range like dawn, mid-morning, evening, or midnight while creating a booking. To learn more, please visit Allow Customers To Select an Exact Start Time for Their Bookings
- Allow customers to upload photos when making a booking
Admin users can enable this flag to allow their customers to upload any photos related to the required service. To learn more about this feature, please visit Allow customers to upload photos when making a booking
- Allow customers to upload pdf through the booking page
- Allow customers to rate your bookings through the booking page
You can enable this flag if you want your customers to rate their bookings from the booking view page in the customer portal, noting that the rating will be available to customers once the booking is completed.
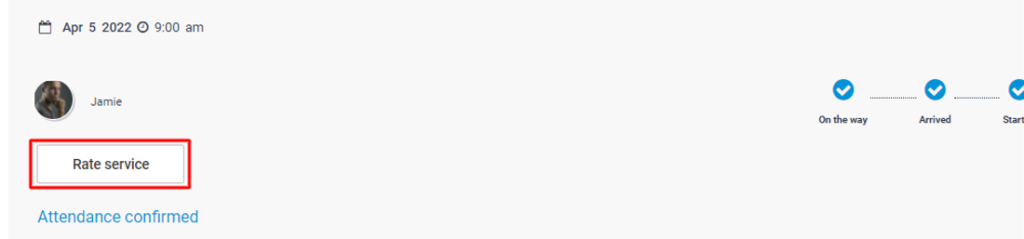

To learn more, please visit Allow customers to rate your bookings through the booking page
- Make uploading images mandatory for customers when making a booking
If your business requires that you inspect the location of the required services prior, you can enable your customers to upload images and make the images upload mandatory during the booking process, this way, your fieldworkers would have an initial idea about the level of service required and if sub-service is needed as well.
To learn more, please visit Make uploading images mandatory for customers when making a booking
- Display service and custom field pricing structure to customers
- Update service pricing on the go
You can enable Update service pricing on the go to allow your customers to view the pricing update while making a booking. For example, if a customer was making a booking and started by adding a certain service, its price will be displayed, and if your customer added another service to the cart, the pricing will be updated in real-time and before the customer is redirected to the check-out page. For more info, please visit Update Service Pricing on the Go
- Display service minimum price
You can set up a service minimum price to be displayed to your customers to enable them to view the starting price or the minimum price for each service before deciding to book your services. For more info, please visit Display Service Minimum Price
- Display pricing of custom fields added to the service in the view service page
When you create services, you have the option to add custom fields such as different durations, OctopusPro allows you to add pricing to these custom fields and to display its pricing to your customers on your customer portal.
For more info, please visit Display pricing of custom fields
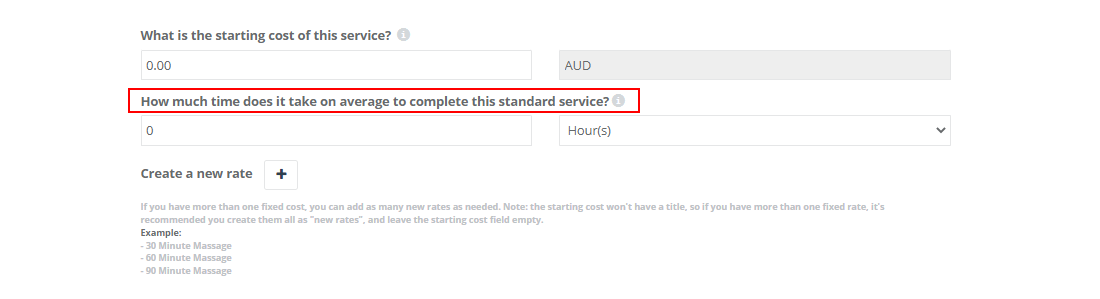
- Display booking duration / estimated time to customers
You can enable this flag to allow your customers to figure out how long the provided service would take to be completed. To learn more, please visit Display booking duration / estimated time to customers
- Display “Is parking available?” question during checkout
By enabling this flag, your customers can help your fieldworkers determine if there will be available parking in the booking location or not, so that they could calculate the time needed to arrive, to make it to the booking location on time and not waste time or be unaware of parking policies in the area of the booking. To learn more, please visit Display “Is parking available?” question during checkout
- Display additional notes area for the customer during checkout
You can enable this flag to allow your customers to add any additional or extra notes regarding their booking. To learn more, please visit Display additional notes area for the customer during checkout
- Select at least one customer property during the booking process. To learn more, please visit Select customer property during the booking process
Fieldworkers flags
- Display fieldworker name to customers
- Display fieldworker contact details like email and phone number to customers
Admin users can enable this flag to display fieldworkers contact details to customers, such as email addresses and phone numbers. Customers will be able to view fieldworkers contact info when accessing fieldworkers’ profiles.

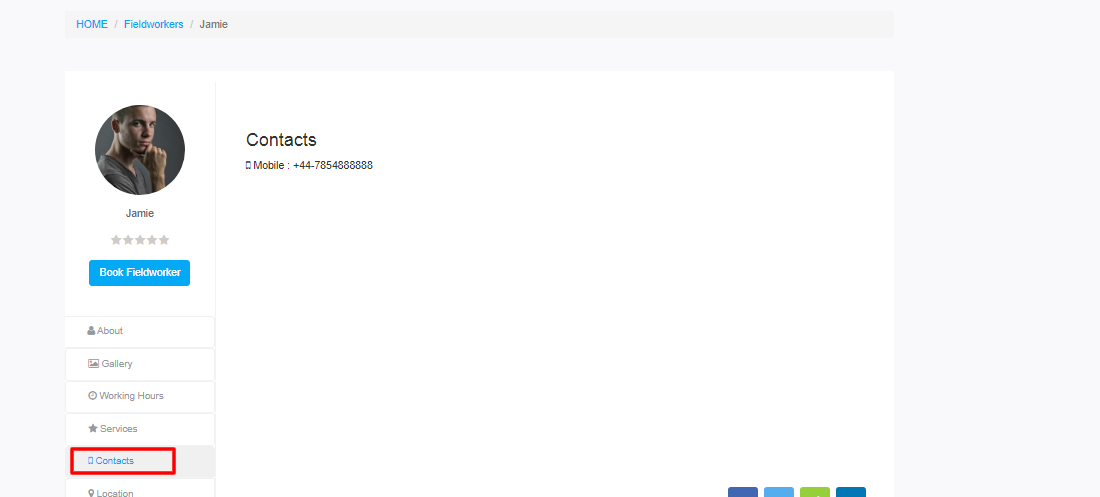
To learn more, please visit Display fieldworker contact details to customers
- Display fieldworker social networks links
By enabling this flag, and if your fieldworkers have their social networks linked to their OctopusPro accounts, then you can display them to your customers when they click to view any fieldworker’s profile. When your customers click on any of the icons of the social networks, they will be redirected to the fieldworkers’ social platforms linked.
![]()
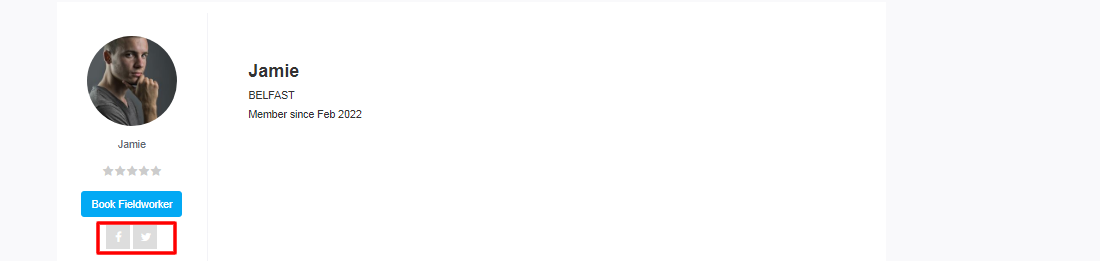
To learn more, please visit Display fieldworker social networks links
- Display fieldworker star rating to customers
If you enabled your customers to rate your fieldworkers, you can also enable the rating to be displayed on the fieldworker’s profile by enabling this flag, noting that OctopusPro allows you to edit or reset your customers’ rating which was given to your fieldworkers in case it was unfair or submitted by mistake.

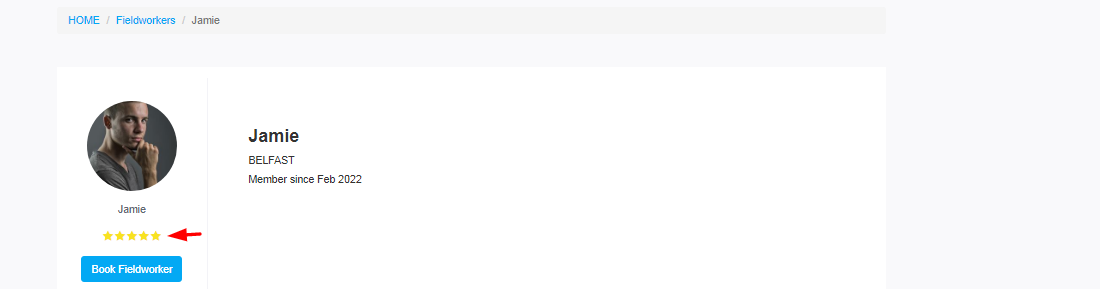
To learn more, please visit Display fieldworker star rating to customers
- Display fieldworker list and make fieldworker profiles public
You can allow your customers to view a list of available fieldworkers by enabling this flag. Customers will be able to view your fieldworkers list and access their profile as well so that to allow them to book their preferred fieldworker directly.

To learn more, please visit Display fieldworker list and make fieldworker profiles public
- Display fieldworker date joined to customers
Allow your customers to view the date your fieldworkers have joined your team by enabling this flag.
Go to Settings> Customer Portal> Flags & Permissions> Fieldworker Flags and enable Display fieldworker date joined to customers. The date of joining will be displayed under the fieldworker profile.
![]()
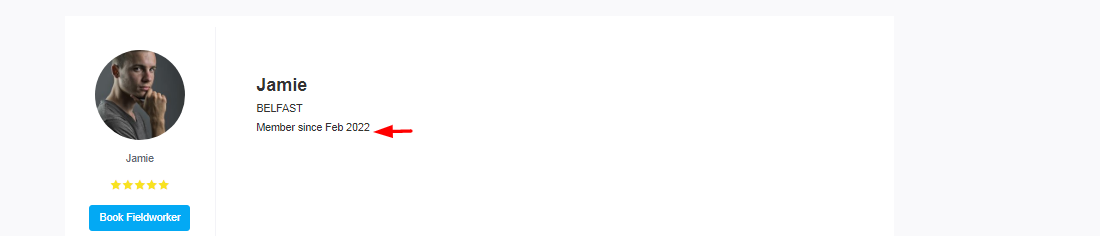
To learn more, please visit Display fieldworker date joined to customers
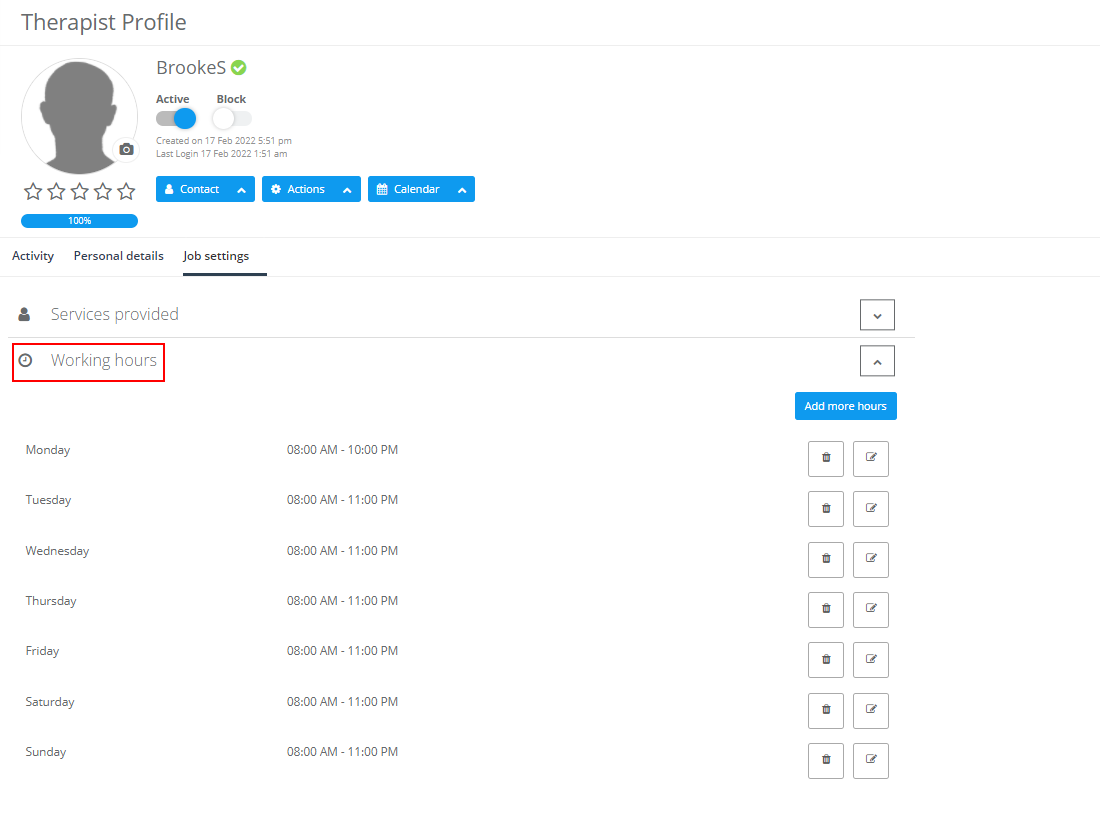
- Display fieldworker working hours in fieldworker profile
If you enabled public view to your fieldworkers’ profile, you can also enable this flag to display your fieldworkers working hours to your customers, allowing them to know the available time for their favorite fieldworkers.
![]()
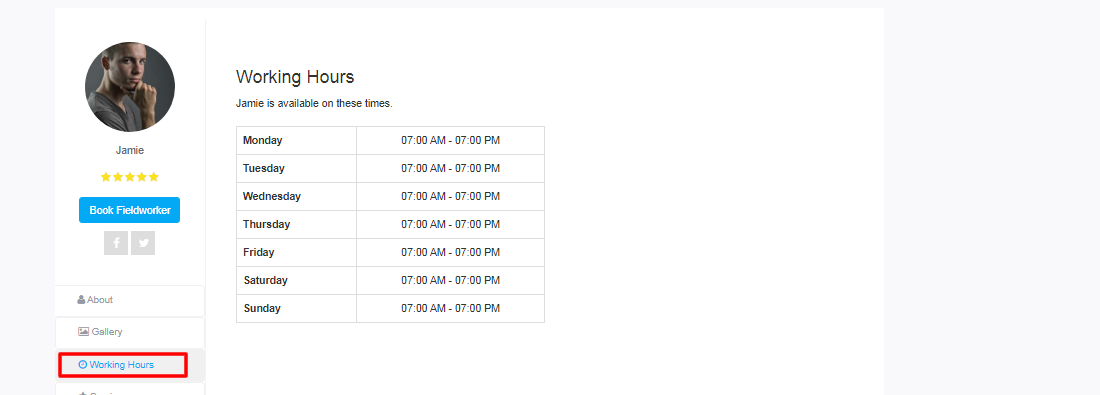
To learn more, please visit Display fieldworker working hours in fieldworker profile
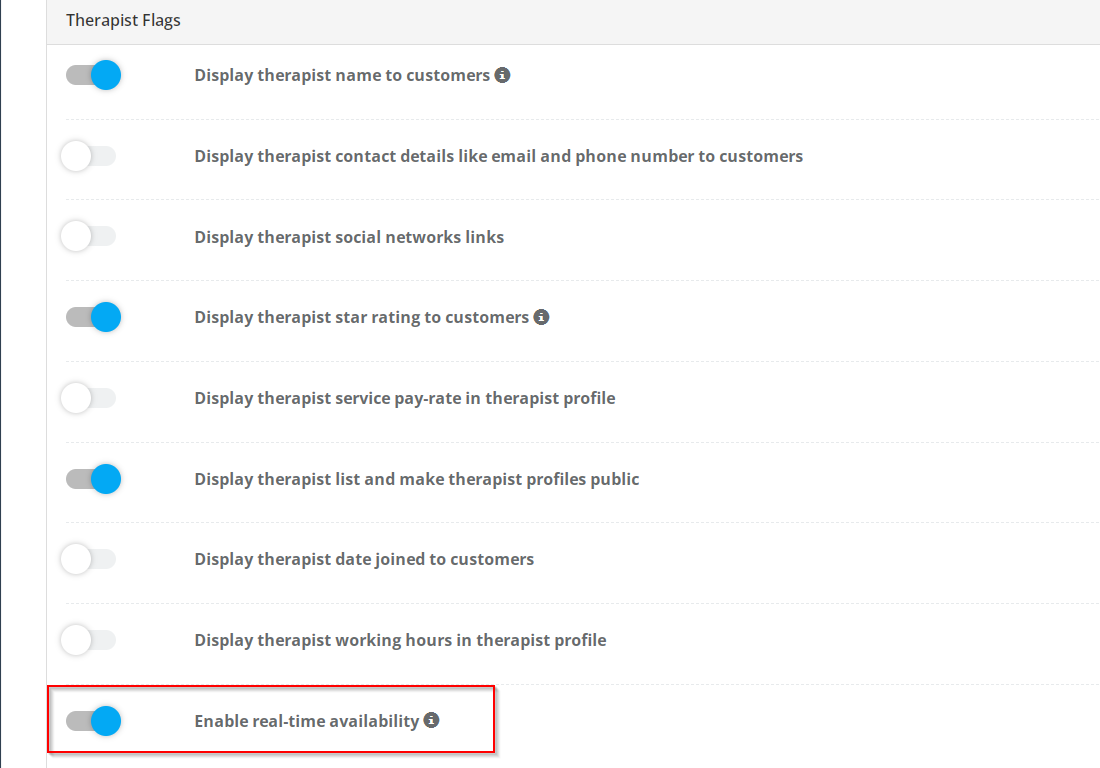
- Enable real-time availability
You can enable this flag to prevent double-booking, and make sure that your booking process will depend on your working hours and your fieldworkers availability.
To learn more, please visit Enable real-time availability
Payment & accounting integration
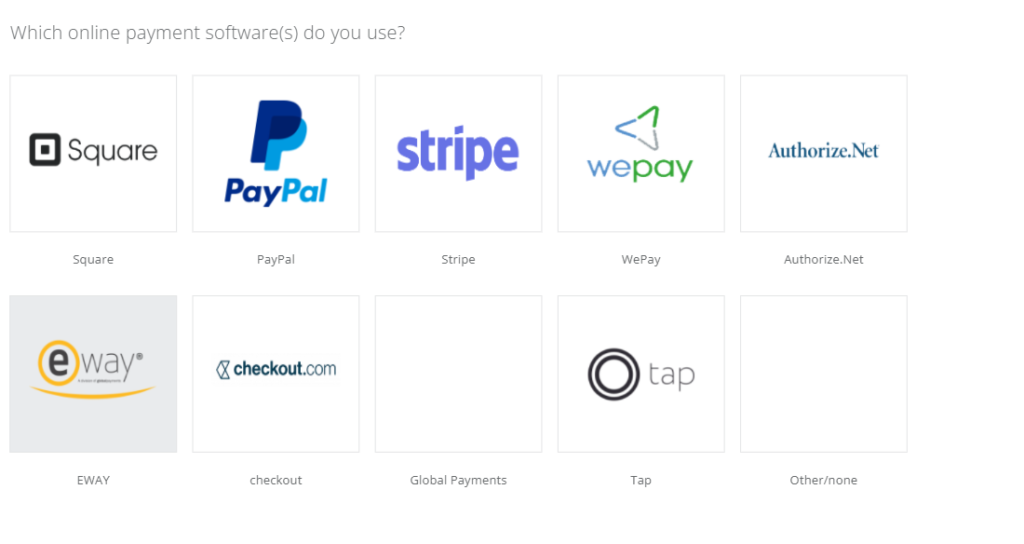
OctopusPro integrates with most leading payment providers, including Paypal, Stripe, Square, Authorize.Net, E-Way, We-pay, Checkout.com, Tap, Global Payments, and others.
How to set-up payment integration?
To set up your payment integration, navigate to Settings> Financial Settings> Payment Integration.
OctopusPro allows you to apply different settings to meet your business needs, as listed below:
- Add multiple payment types, so you can use, for example, a combination of credit card payments, and PayPal. You can store your customer’s credit card details for booking confirmation and charge the stored card following job completion. Your customers credit card details will be stored safely and securely with your integrated payment gateway.
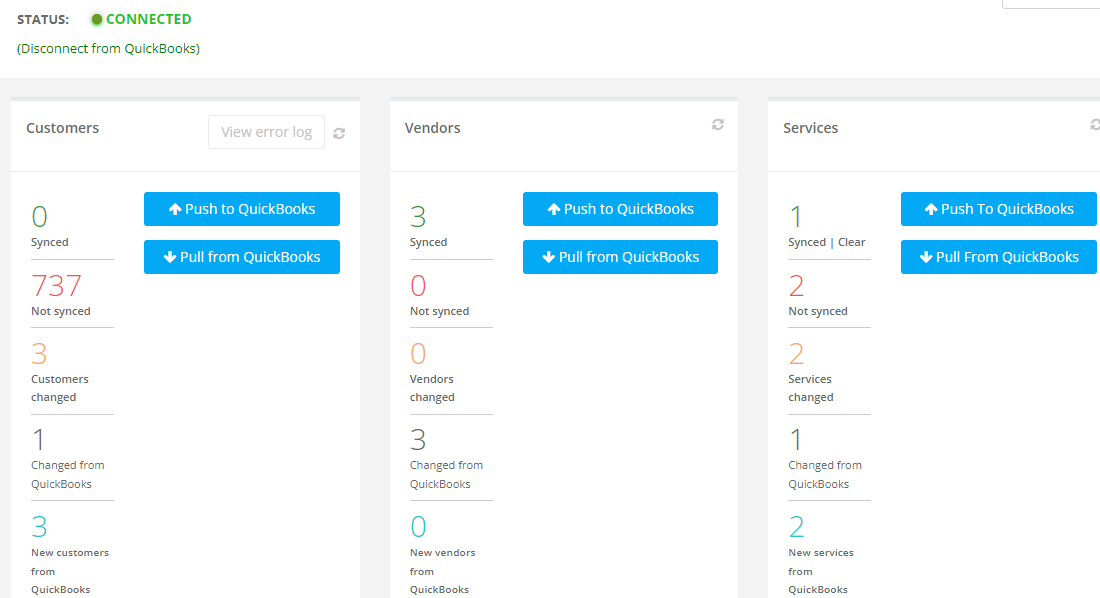
- Integrate with Xero and Quickbooks to help import customers and services, which saves time setting up your account, otherwise, you can just import data or set it up manually.

- Import bank feeds and automatically match payments to invoices for them to approve.
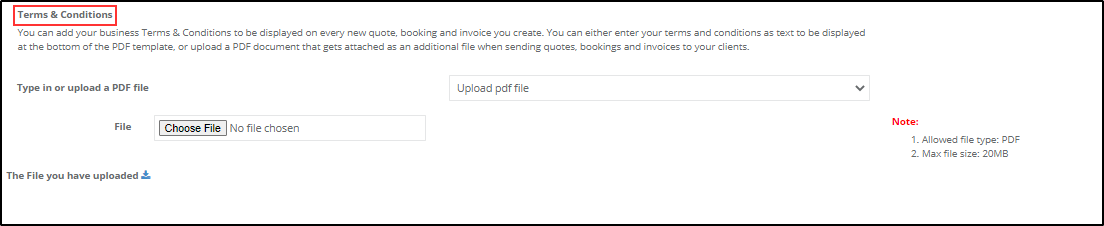
- Add your payment terms and conditions for your clients to accept when making the booking.
- Ability to allow your customers to pay by cash or bank transfer.
Setting up Services
OctopusPro allows you to set up your services and pricing structure while setting up your account so that it would be ready for customers to place bookings. You can also add or edit services after set-up.
For more information, please visit Create a New Service – OctopusPro

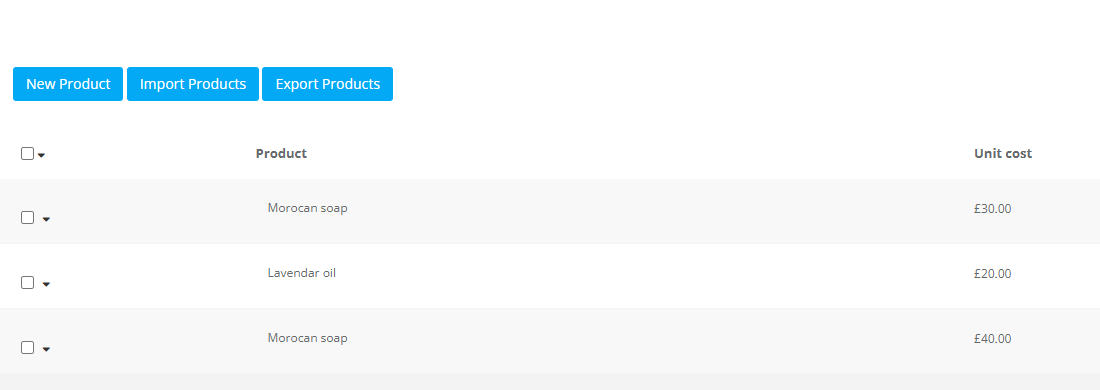
As part of your services, your business may also use various products that you include with your service pricing, and you may also sell these products to customers directly.
With OctopusPro you can create a product price list and easily attach products to bookings, as well as sell products directly through your customer portal, separate from your services.
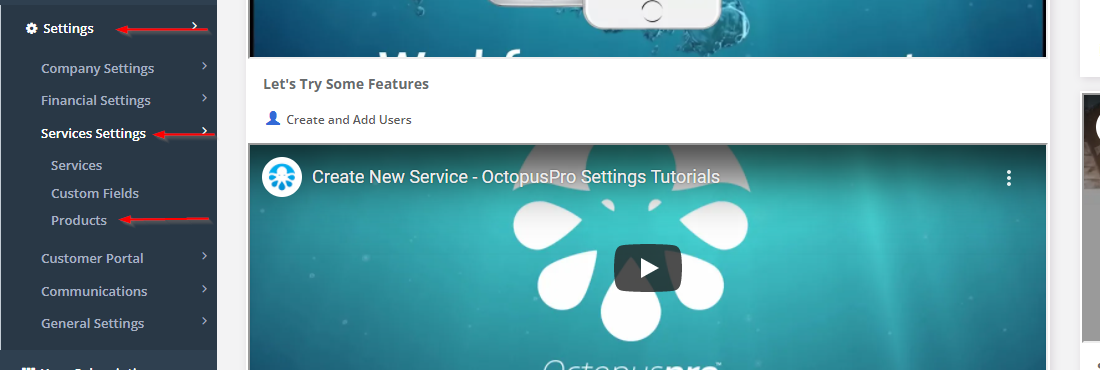
To get started setting up your products list, head to your Menu, and select Settings. Open your Services Settings, and “click on” Products, which takes you to the “Manage your products” area.
 Your first product options relate to the functionality you want your products to have;
- Firstly, your product list will be visible to your office users as new bookings are created, so products can be added to bookings directly.
- If you want your products to also be visible in your company’s Branded app, customer emails, and attachments.
- Whether it is mandatory for your fieldworkers to enter product information in order to complete a job. This means that without entering product information your fieldworkers won’t be able to set a job status to “complete”.
- If you would like a product cost breakdown included with customer quotes and invoices, and …..
- Whether you would like a product thumbnail, or image attached to product quotes.
Next start entering your specific product information.
Take note that if you already have a product list, products can also be uploaded directly into OctopusPro via CSV file by selecting “Import Products”.
 To manually add a new product click on New Product, which opens a new window.
 Enter product name, Let’s say, for the purpose of this example, our business is a car detailing business, and our new product is a liquid that we use for our service called “Pro-care Rapid Shine”, we’ll assign this new product the code “PN001”.
Under “Item Label”, you add the base measurement unit for your product, so for a liquid typically use a gallon or liter. We’ll sell our new product by the liter.
Then add the unit cost of our product, the per unit price your business pays for the product, and we’ll say our product costs us $10 per liter.
And next add your markup percentage, what you charge your customers per unit. We are going to add a 40% Markup.
Next, add a product description, we will add “Pro-care Rapid Shine is the industry benchmark product that greatly improves the performance of your……etc.”
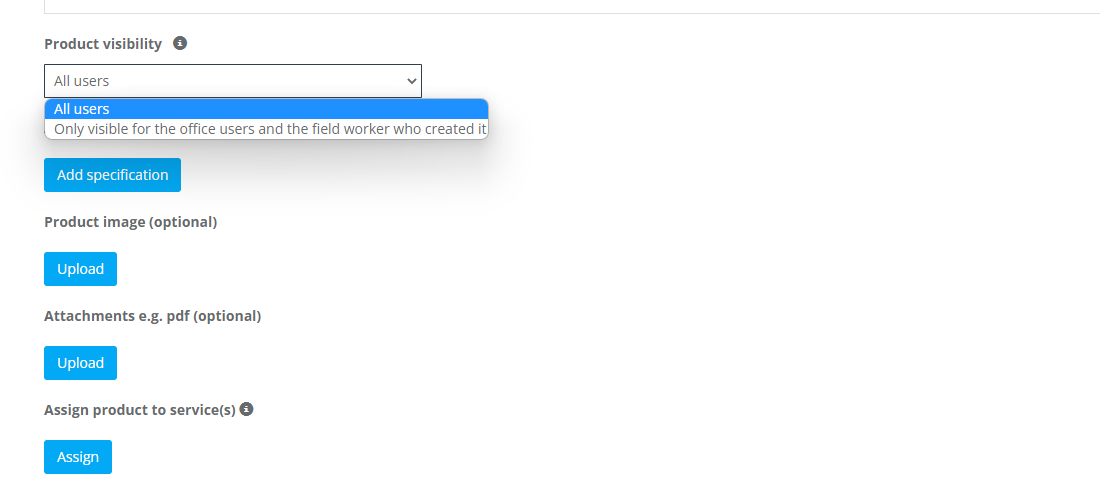
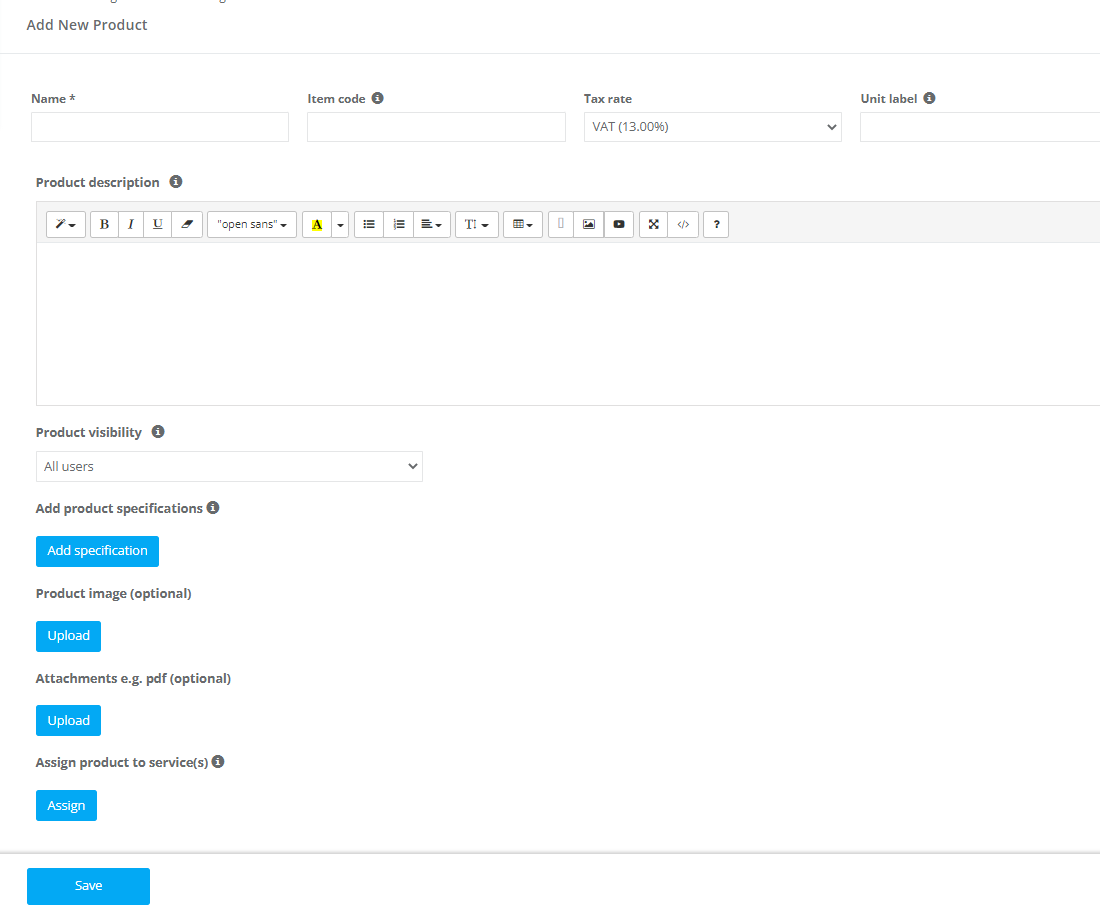 Then select who your new product will be visible to. Do you want your product visible to all users, including customers? Or only your office staff and fieldworkers, for example, if your customers are not made aware of the products you use and won’t see the cost breakdown.
 You then have the option to add multiple Product Specifications or product formats. For example, we added our base product as being a liter unit, which costs us $5 per liter unit to buy, and here, if let’s say our product is also available in 5-liter quantities and for example, the value of the 5-liter pack is $20 per unit, you can add that information. Other possible Product Specifications could include a specific product brand name or color variation, or product production date.
Next you can Upload a product image.
You can also attach any documentation, such as a product sales brochure or product data pdf.
Assign your product to the related services. We will add this product to the service we created earlier. Save.
And once again we are back on the Add new product page, save once again. And here is the new product added, which is now also visible as a product option when entering new bookings with your product cost included.
To learn more about adding products to your OctopusPro account, visit the OctopusPro youtube channel, and check out the comprehensive Octopuspro user guide.
Manage your team profiles and availability
OctopusPro allows you to manage your team whether you have one fieldworker or thousands of fieldworkers in your team.
 To add a new fieldworker, please visit Add New Fieldworker – OctopusPro
To add/ remove service to a fieldworker profile, please visit Add/Remove Service(s) to a Fieldworker’s Profile – OctopusPro
Job Assignment
If you are an owner-operator and the only fieldworker available, then all your jobs will remain on your general fieldworker profile, you don’t need to worry about job assignments and can basically skip this part.
However, if you run a team, when a booking is placed in OctopusPro, it must be assigned to a fieldworker in order for it to appear on their calendar and be notified about it.
There are two options regarding job assignments. Manual assignment by an office user or automatic assignment based on rules set in your settings.

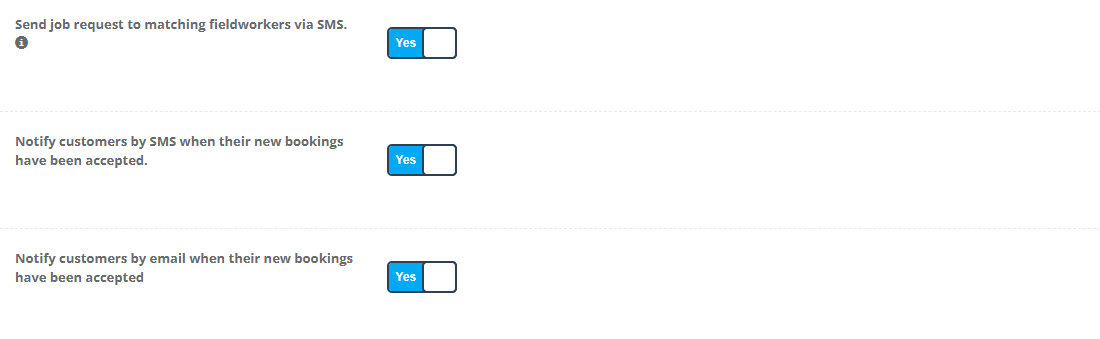
You can send emails and SMS notifications for fieldworkers using the ones drafted or you can edit them.
Notifications can be sent as a push notification into the app “IOS or Android”, to admin users, fieldworkers, or customers, also, you can enable customers to receive SMS notifications which require a digital phone system account to be set up like Twilio.
Forms and checklists functionality
OctopusPro enables the creation of checklists that can be used for collecting information from customers, fieldworkers, or office staff.
 You can build forms that collect the required information from customers when placing a booking, or you can build job completion checklists for your fieldworkers to complete onsite to ensure they have completed all their required work and that your defined business processes are being followed, ensuring nothing is neglected, and that your business stays compliant with regulations.
You can also easily send completed forms and checklists to your customers or other parties following a site visit or job completion, your fieldworkers can also send them directly from the app if given permission.
When creating a new form or checklist, you can choose exactly when you want it to appear. For example, you may want your fieldworker to complete the checklist following arrival at the Jobsite, or after a job has been completed.
 The forms and checklists feature is similar to the custom fields feature, but it’s used for different purposes so it’s important to understand the differences between them.
Custom fields, which are located under service settings, are used for the questions you ask your customers about the service they require when making the booking.
 While forms and checklists are used for the questions you ask your customers or fieldworkers to complete after the job has started or when the job has been completed.
Custom fields can affect service pricing and availability and can show as part of the invoice breakdown, while Forms and checklists don’t affect service or availability and are not part of the invoice breakdown.
 Forms are related to the overall booking even when they are linked to a service (so it will show once per booking even if linked to a service that is added multiple times in the booking), while custom fields are related to individual services and will show for each service, even if it’s repeated in the same booking, so if the service is added multiple times they need to be filled each time.
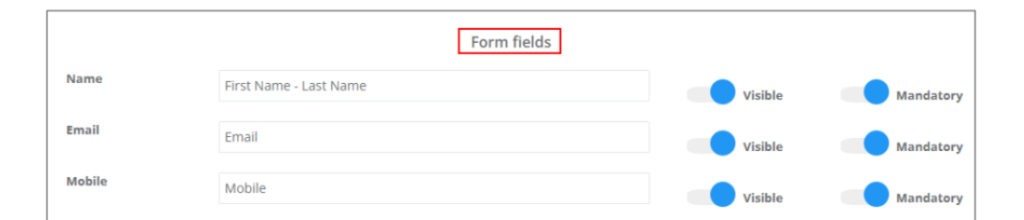
You can also use the forms and checklists feature to display more questions to your customer while making a booking, the questions should be related to the booking overall rather than a specific service.
You can set your form and checklist to display to your customers when making a booking in the customer portal by making sure the form is visible to customers under the visibility option, and selecting “Always displayed” under the “when to display” options. These can be very generic questions that you want to ask your customers when making the booking, like “Have you ever used a mobile massage service before?”.
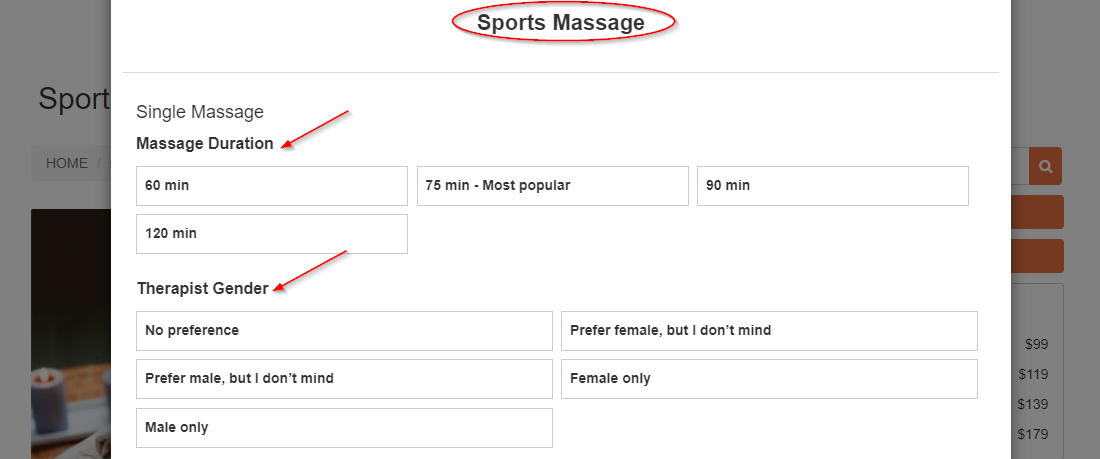
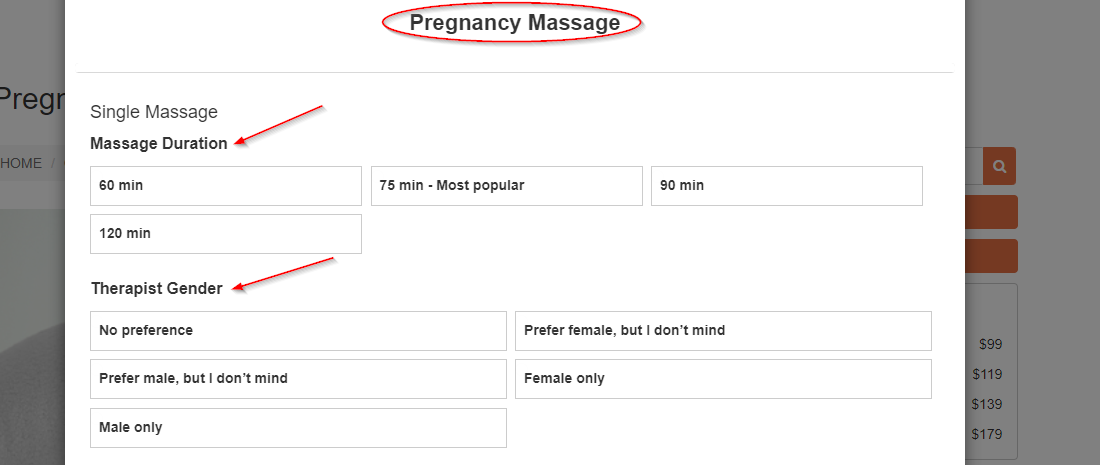
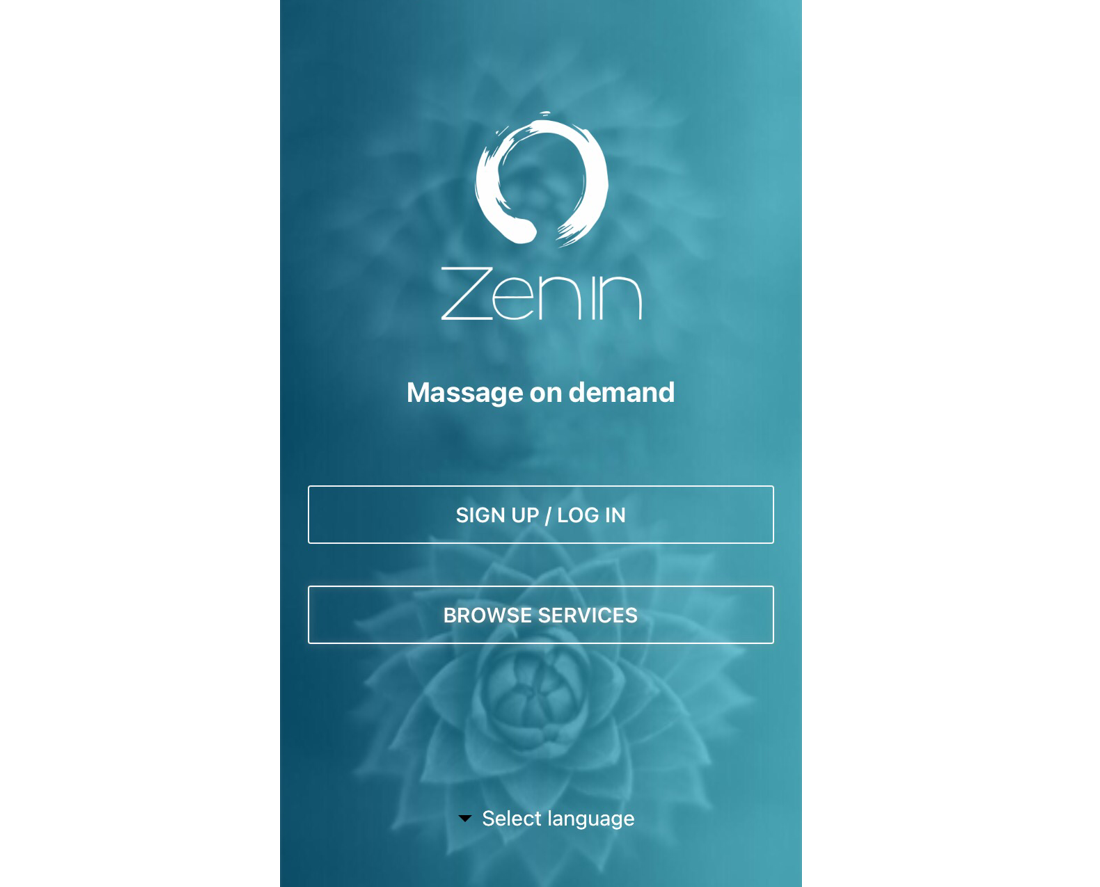
Let’s now see how it will show to the customer while making a booking, let’s go back to Zenin, select Swedish Massage, go through the custom fields, then are prompted with the question that we added.
You can also set up customer satisfaction surveys with questions relevant to the service provided. You can automate the survey to be sent to your customers once a booking is complete and paid. This is different from the star rating feature as it allows you to include more detailed questions and options rather than a simple star rating. You can use the information you gather to improve your services and operations.
Let’s go through the process of creating a fieldworker checklist, that displays once the fieldworker has checked in to a job.
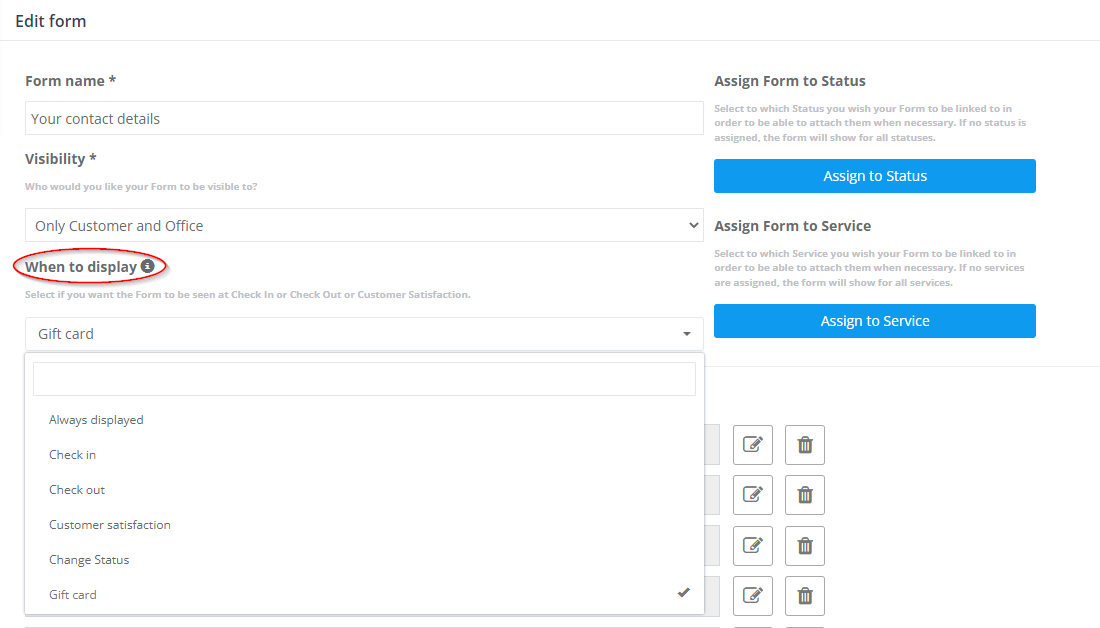
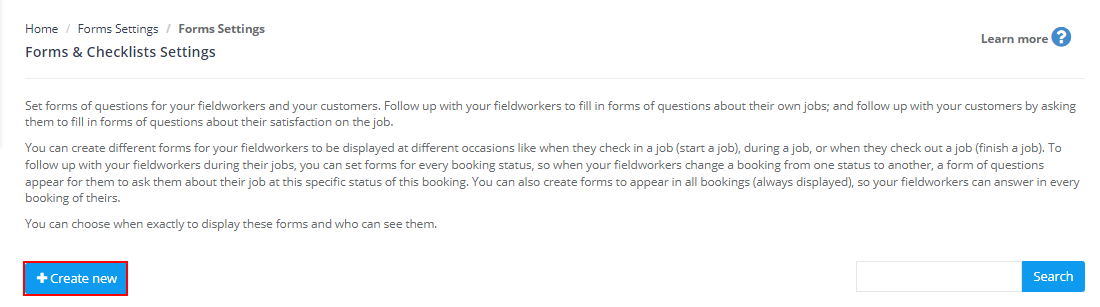
Navigate to Settings> General Settings> Forms and Checklists, click on Create New
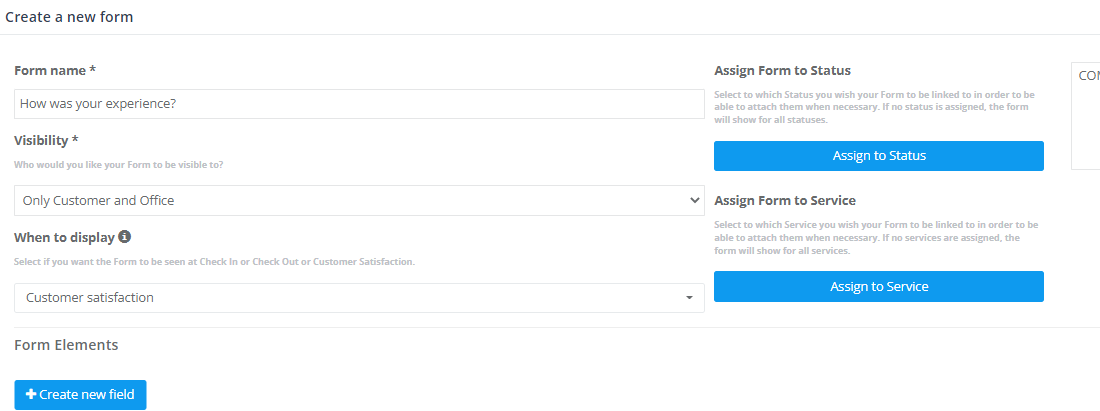
 Enter a “title” for your new checklist under “Form name”. Let’s call this checklist “before job start checklist”
 Next, you can choose who you want your checklist to be displayed. Under “Visibility” you can make your checklist visible to either everyone with access to the job, visible to your office staff only, visible to your “customer and office staff”, or visible to the “fieldworker and office staff” which is the option we will select in this example, as we want our fieldworker to go through the checklist before starting their work, and for this job we don’t require this checklist to be made visible to customers.
 Under the option “When to display” you are given the choice to determine when your new checklist will appear, you can choose either to have your checklist displayed at all times for a job when your fieldworker either checks in or out of a job or, if you are creating a customer satisfaction survey, you would select the “customer satisfaction” option, which will send the customer satisfaction form to your customers once their job is complete and payment is made.
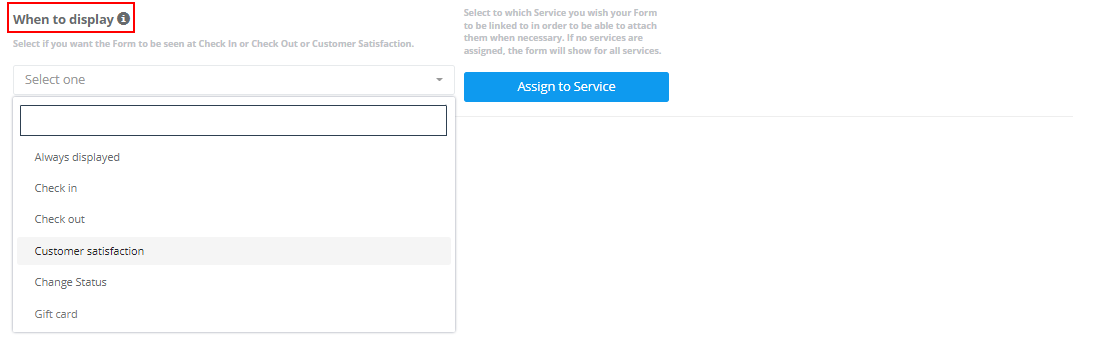 You also have the option to display the checklist during each job status change.
We want our checklist to appear after the job Check-in, note that you are able to select more than one option.
Next, we start entering our fields, meaning adding the items that will appear in our checklist or customer satisfaction survey.
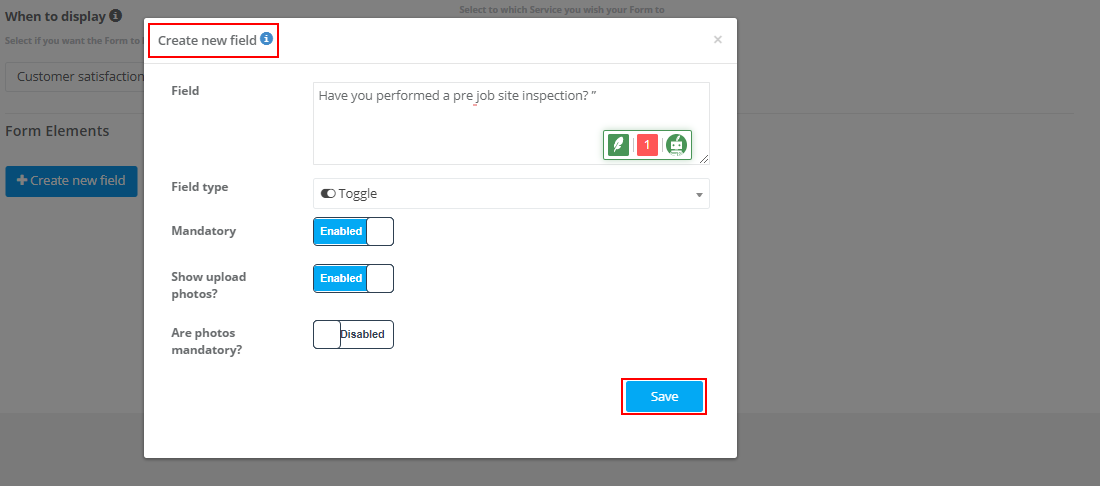
First, select “Create new field”, which opens a new window. Let’s create our first item, let’s add “have you performed a pre-job site inspection”. We want this to appear as a yes / no toggle. We also want our questions to be mandatory. So we will select “YES”. We will enable photo uploads, but we don’t need them to be mandatory, let’s leave that as “NO” and then click “Save”
 Finally, we want to select where and when our checklist will appear. To do that, select Assign the new form to job status. We want our checklist to appear during the “TO DO” job status, so we will check the “TO DO” checkbox and “save”.
Lastly, we will “Assign our checklist to a service”. All your services are displayed and grouped into categories. Here you are given the option to assign your form to either all services in a category or individual services. We will assign our checklist to all services, and select save.
Once your new checklist is complete, select save once again, and you can see the new checklist added and ready for use.
There is no limit to the number of checklists you can create, giving you the flexibility to structure your account to completely suit all your business needs.
If you are a corporate customer, OctopusPro can provide you with a white-labeled app for your business, branded with your business name, logos, colors, and slogans, all fully customized to fit your business image.
Customers can download your branded app and book your services just like they do use your web-based customer portal, except it’s through your own app and you can send push notifications to your customers’ devices.
 Having your own app is a great way to stand out, increase productivity, and retain customers. This is helpful if your business has repeat customers and plans to grow. Your fieldworkers are also able to log in to your app giving you that corporate look that can help take your business to the next level.
Your branded app will be available in the Apple App and Google Play Store.
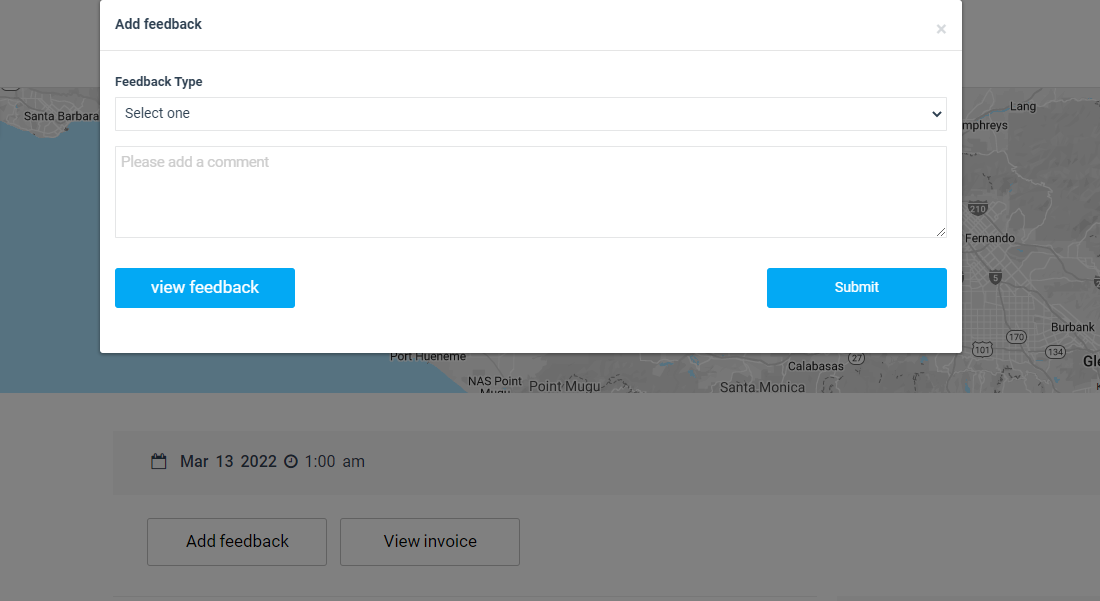
Customer feedback and ratings
OctopusPro has a built-in feedback and rating system designed to help your business collect reviews and ratings from clients regarding the services provided. This is done through an automated background process that can be activated from within your account settings.
 You can also set up customer satisfaction forms and checklists for your customers to complete.
Feedback surveys let your customers inform you of a good or bad experience. You can use this critical information to improve services as well as build customer loyalty and be notified of Feedback directly so you can read and follow up instantly.
 OctopusPro provides simple and effective ways to keep in touch with your customers and to keep them coming back.
You can send targeted automated emails to your customers to improve retention and loyalty; for example, you can send an automatic email to customers that haven’t booked for a period of time containing a special offer, or send a thank note asking about their experience, or send a rewards coupon to customers who have spent over a certain amount. You can also send quote follow-up emails at pre-specified or scheduled dates.
 If you are an OctopusPro corporate client, you can send push notifications to your mobile customers using your own branded app with booking updates and special deals to drive even more sales, unlike SMS marketing using push notifications is free.
For more info, please visit Feedback and Ratings – OctopusPro
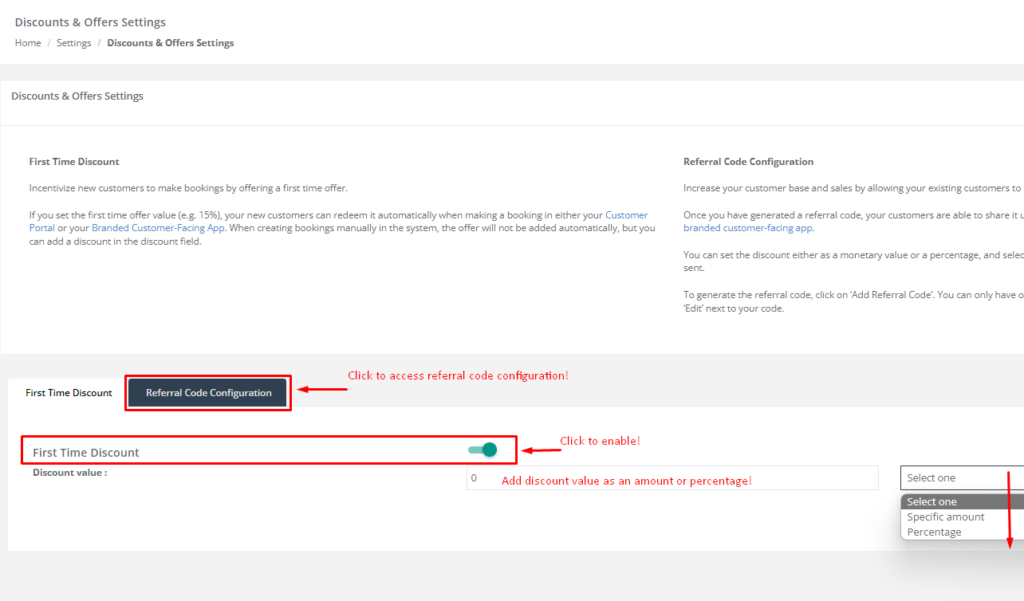
Discount and Offers settings
OctopusPro allows you to entice your customers with discounts and gifts to promote special offers, reward your loyal customers, or respond to negative experiences.
You can set up First Time Discount, Promo codes, and Referral Codes from Settings> General settings> Discounts & Offers.
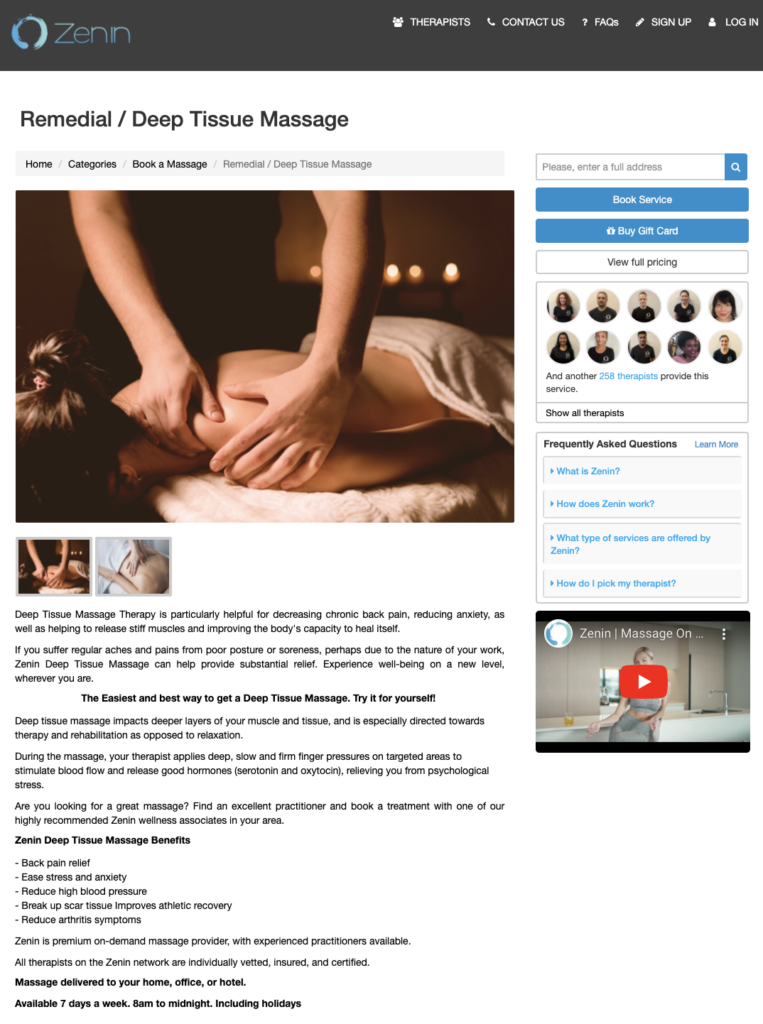
 Customer portal | Use case
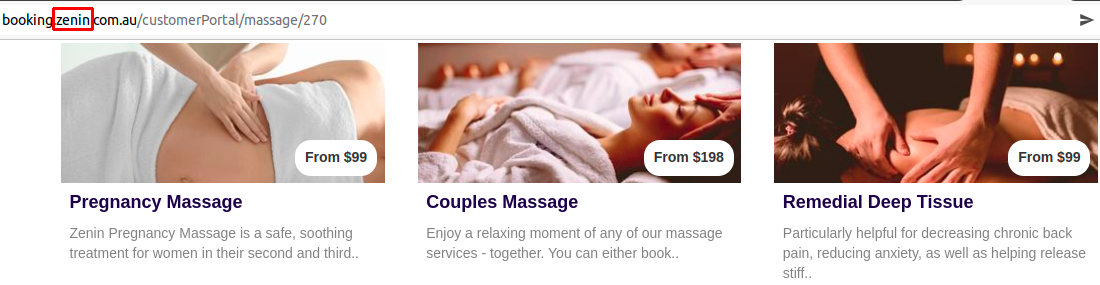
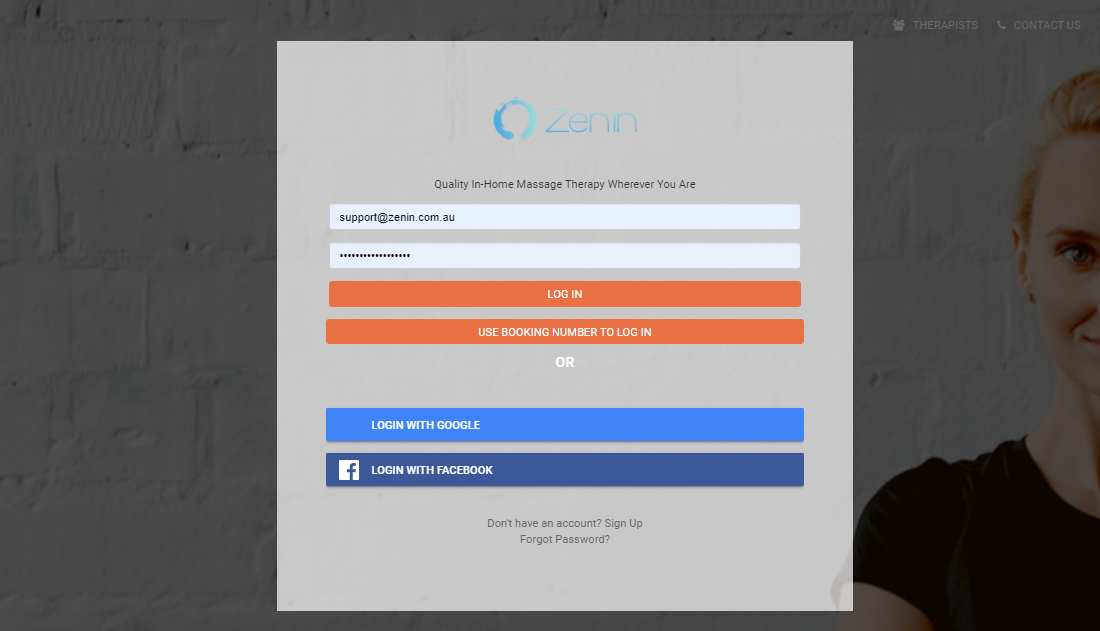
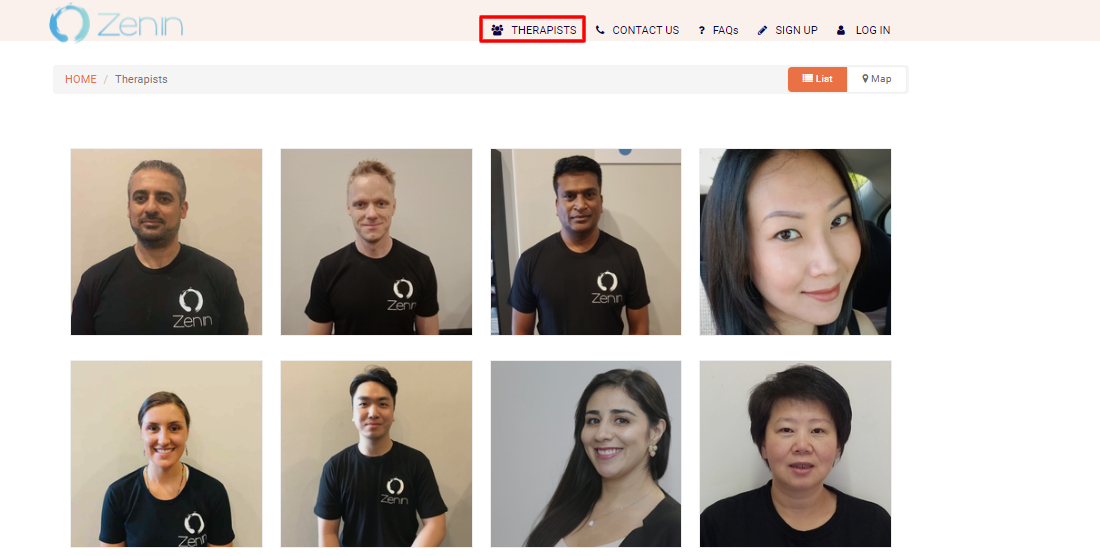
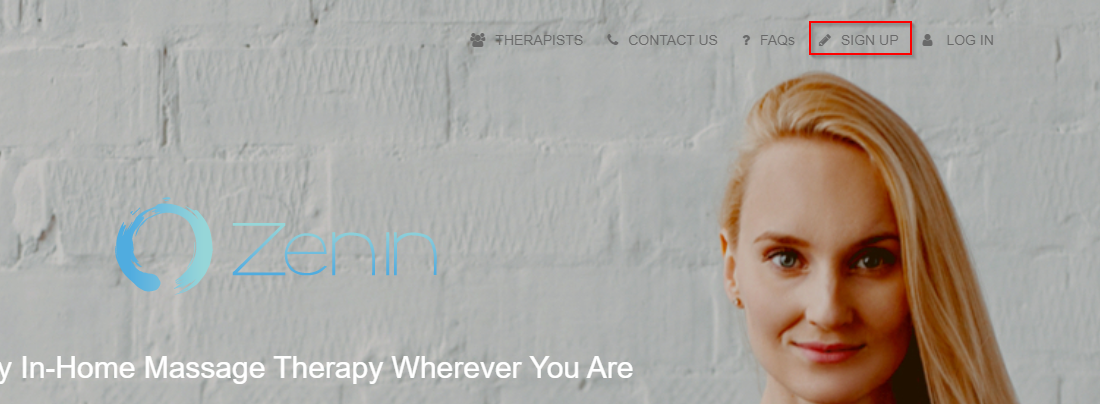
Let’s take a look at an OctopusPro customer portal used by the mobile massage company Zenin.
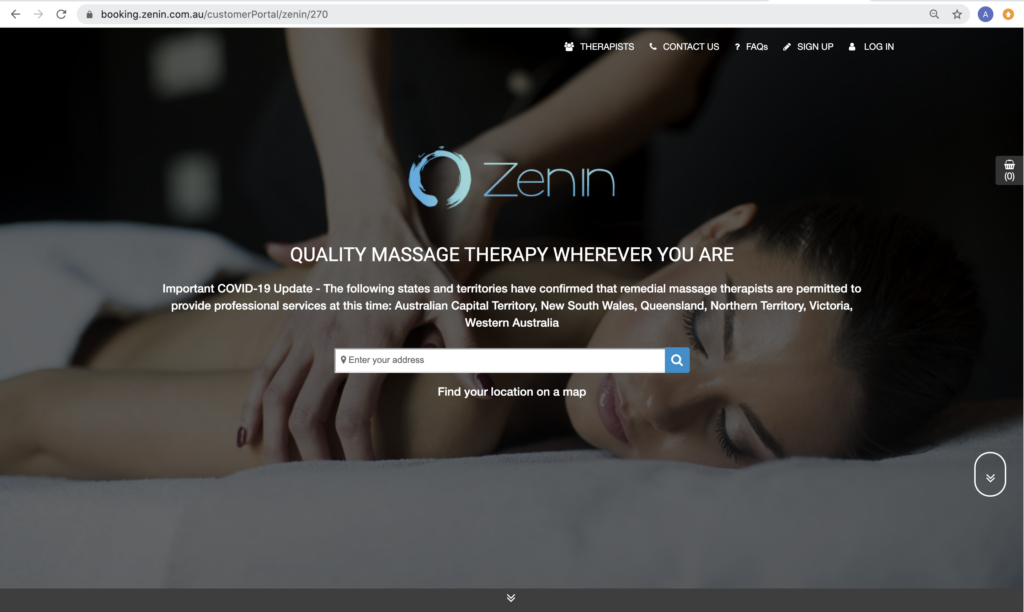
By integrating their website with OctopusPro, Zenin customers can book and pay for services directly. Their customers are also able to send inquiries through the website if they aren’t ready to book just yet, which appear in the OctopusPro inquiries tab for the Zenin office staff to follow up on.
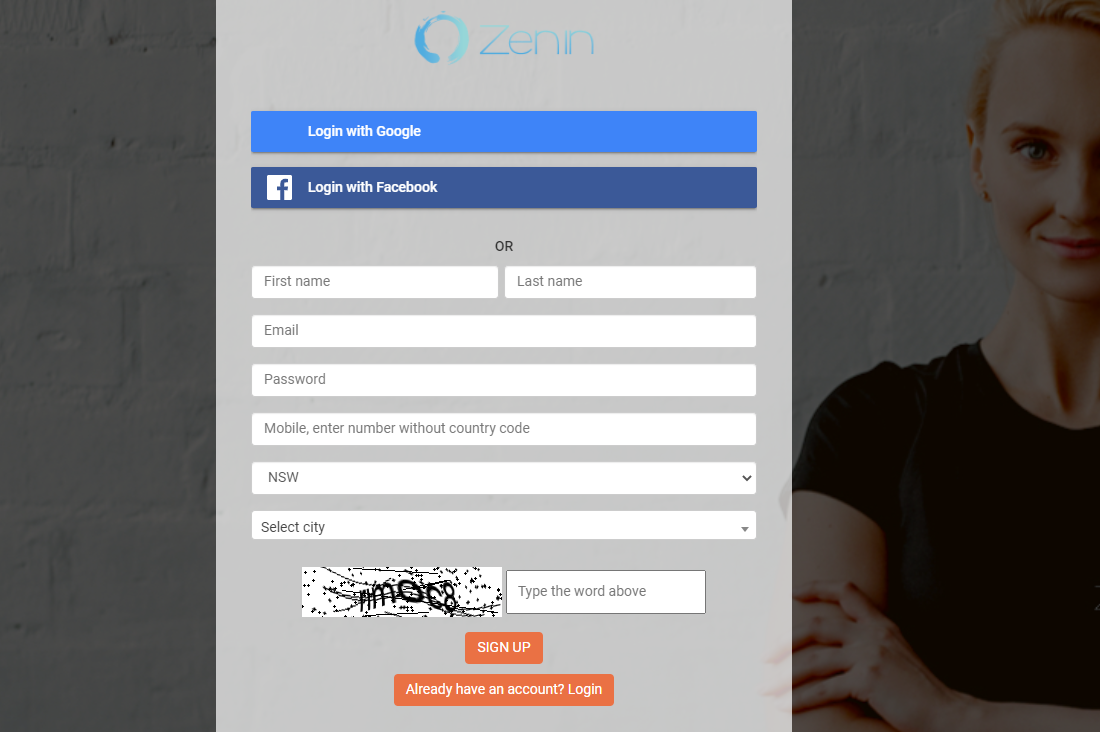
 The OctopusPro customer portal also makes it possible for customers to sign up for an account, and log in to their own Zenin accounts, where they can self-manage their bookings, payments, and profile.
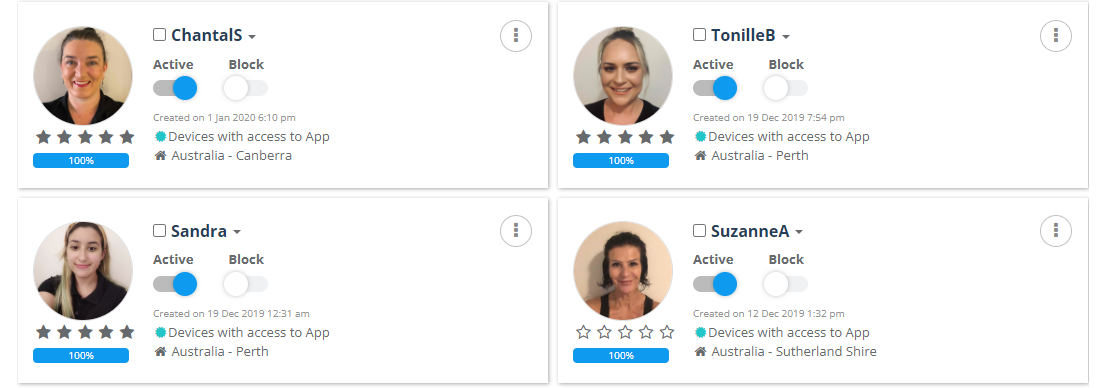
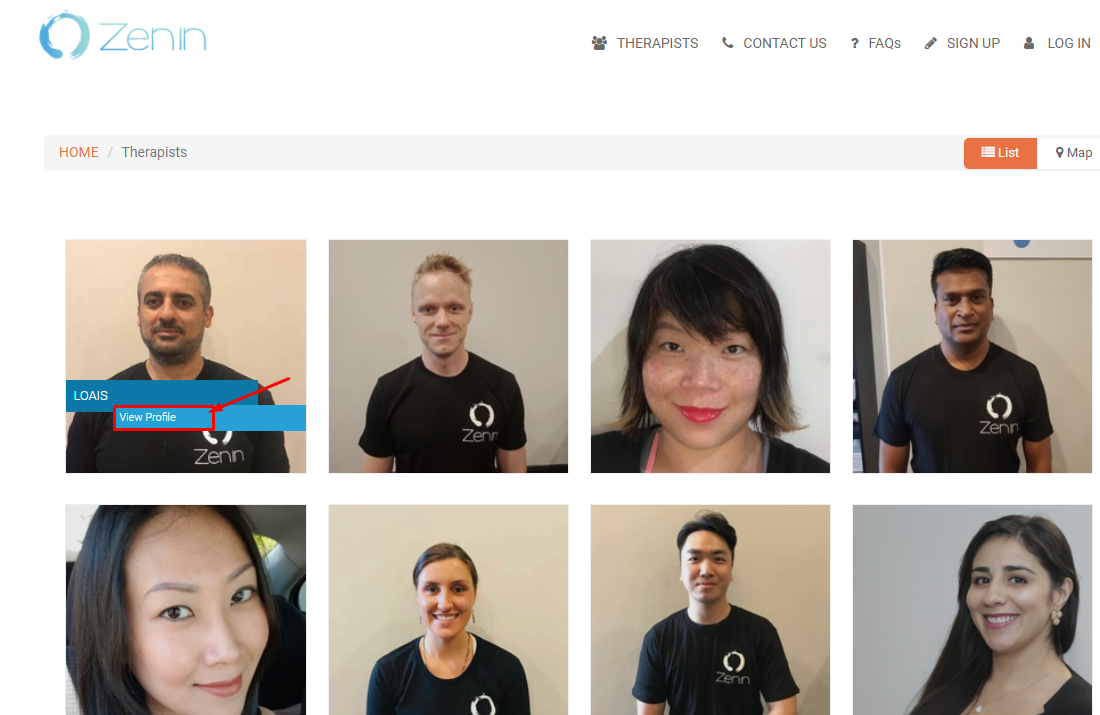
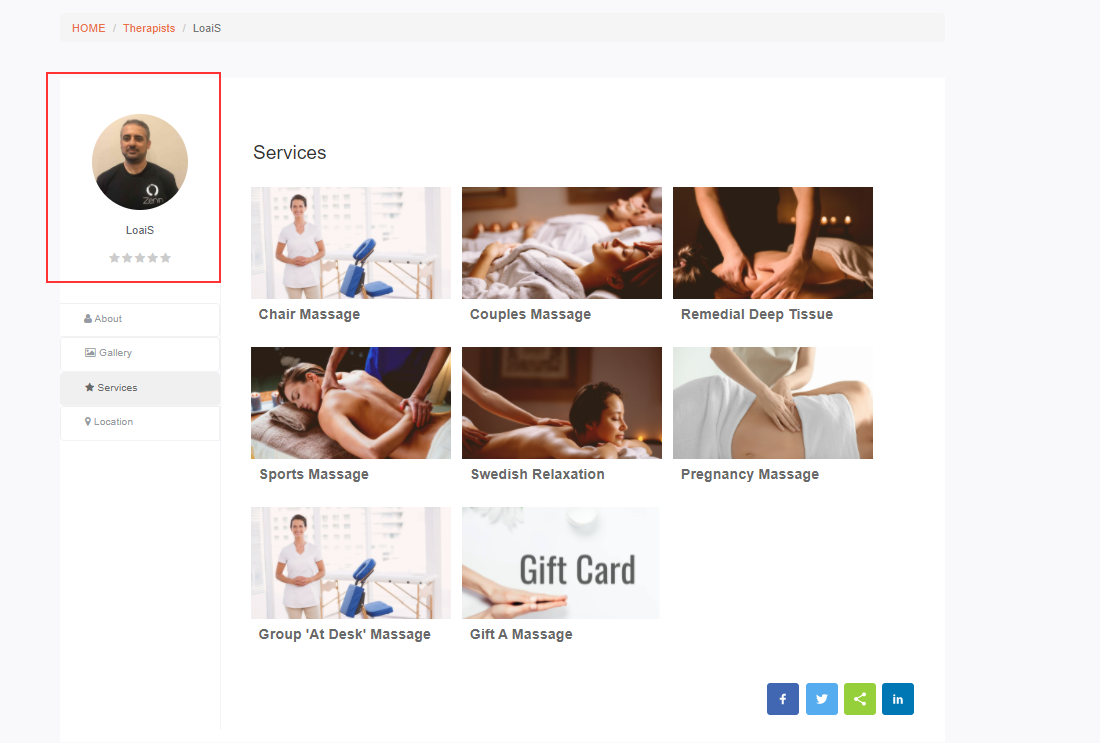
Zenin has also enabled the option to display their therapist’s list “fieldworkers list”, so that their customers can view the therapist’s profile and book their service with the desired therapist directly.

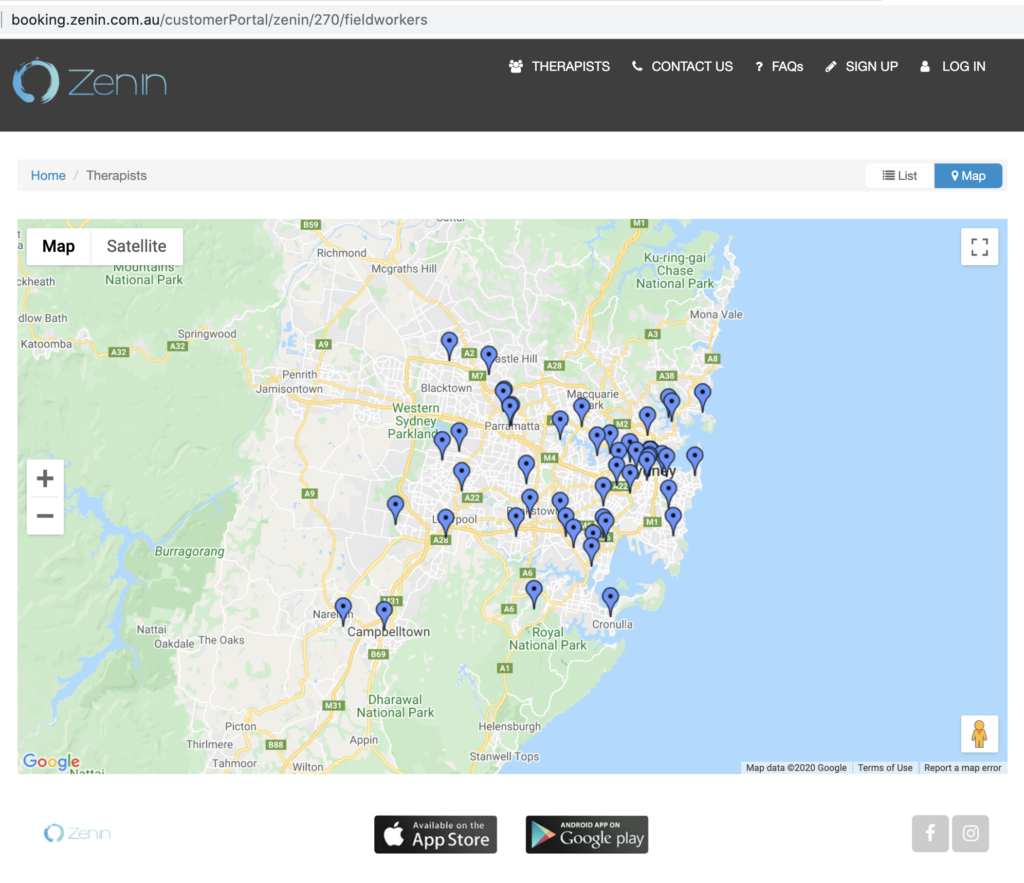
Customers can then view fieldworker locations using the integrated map feature to locate and book therapists in their area. You can decide whether to display fieldworker profiles, locations, names, contact information, address, and other details.
You can also allow customers to contact fieldworkers directly through their fieldworker profiles. Your fieldworkers will receive an app notification and be able to respond instantly. All customer communication can be managed and monitored within your account.
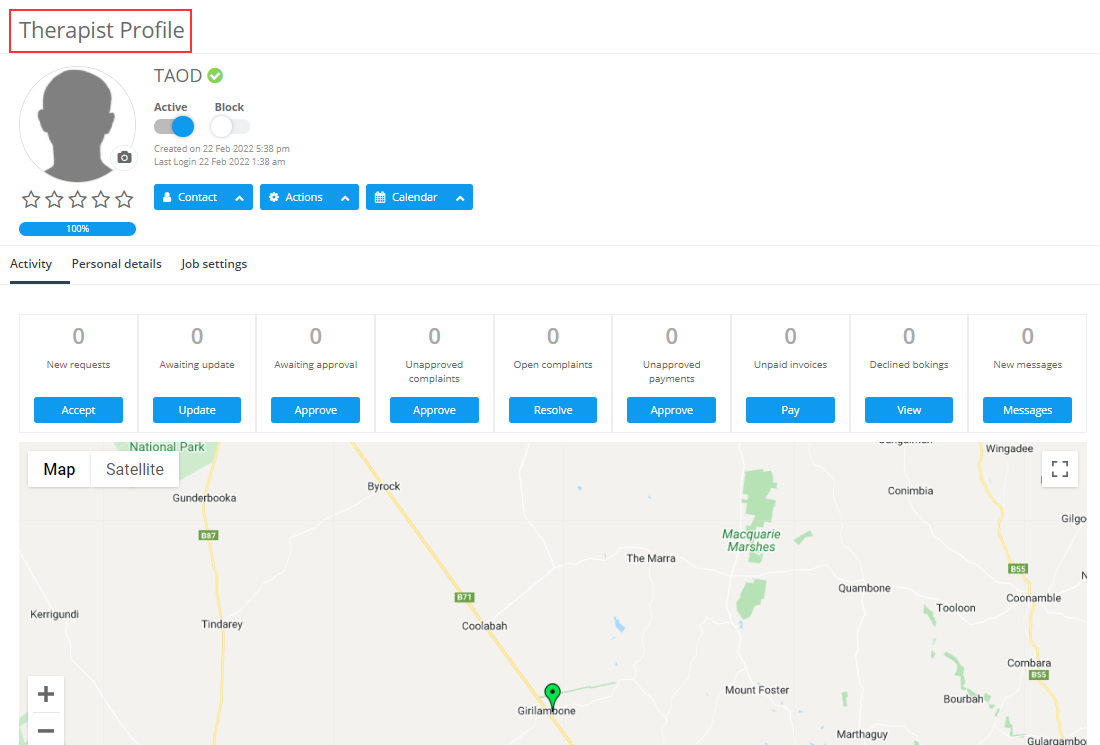
You can allow customers to request a specific fieldworker; either directly through a fieldworkers profile, or they can choose from a list of available fieldworkers during the booking process.
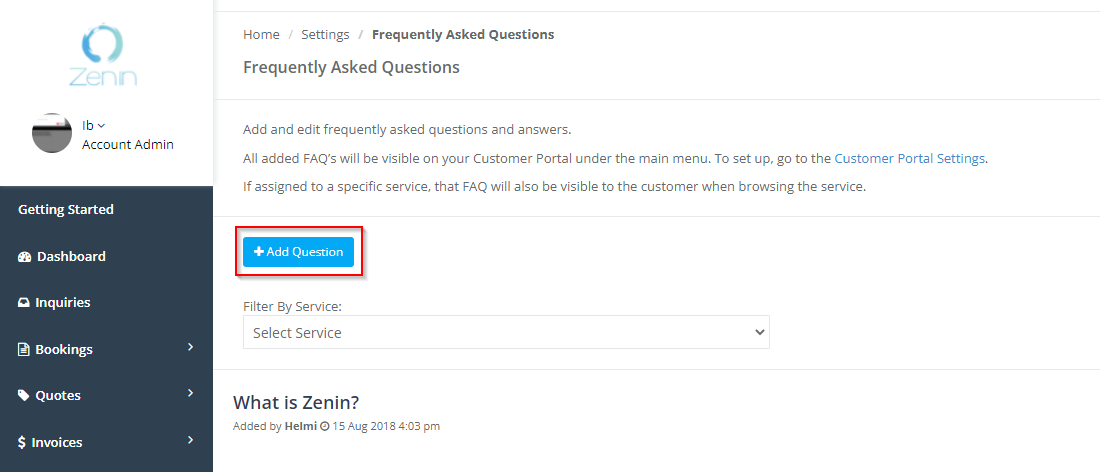
Helpful FAQs can be displayed to customers to improve operations. new FAQs can be added or edited from Settings> Communications> Questions and answers. To add a new question, simply click on Add question, and a new window will pop up, add the question & its answer then Save.

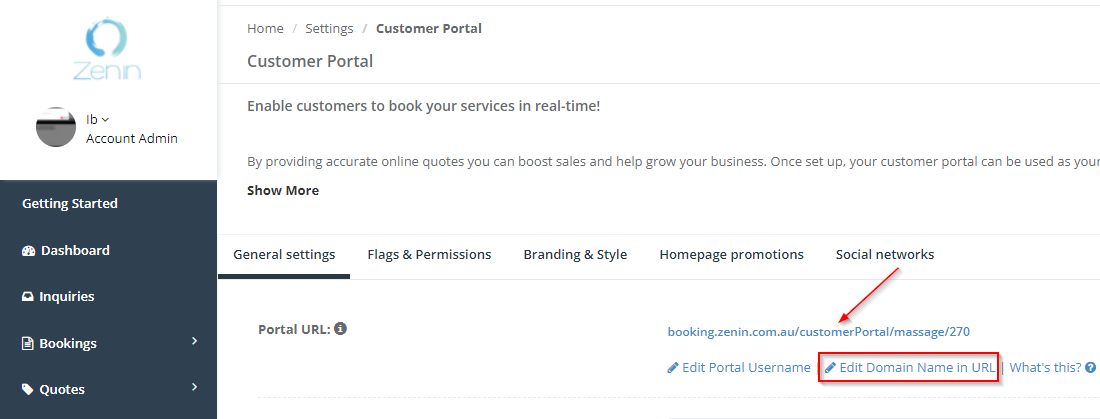
Looking at the URL of linked pages, you will notice that some link to the Zenin website, www.zenin.com.au, while others link to the subdomain booking.zenin.com.au, which is the OctopusPro customer portal white-labeled to use a Zenin URL. You can edit your URL under the Customer Portal General Settings.
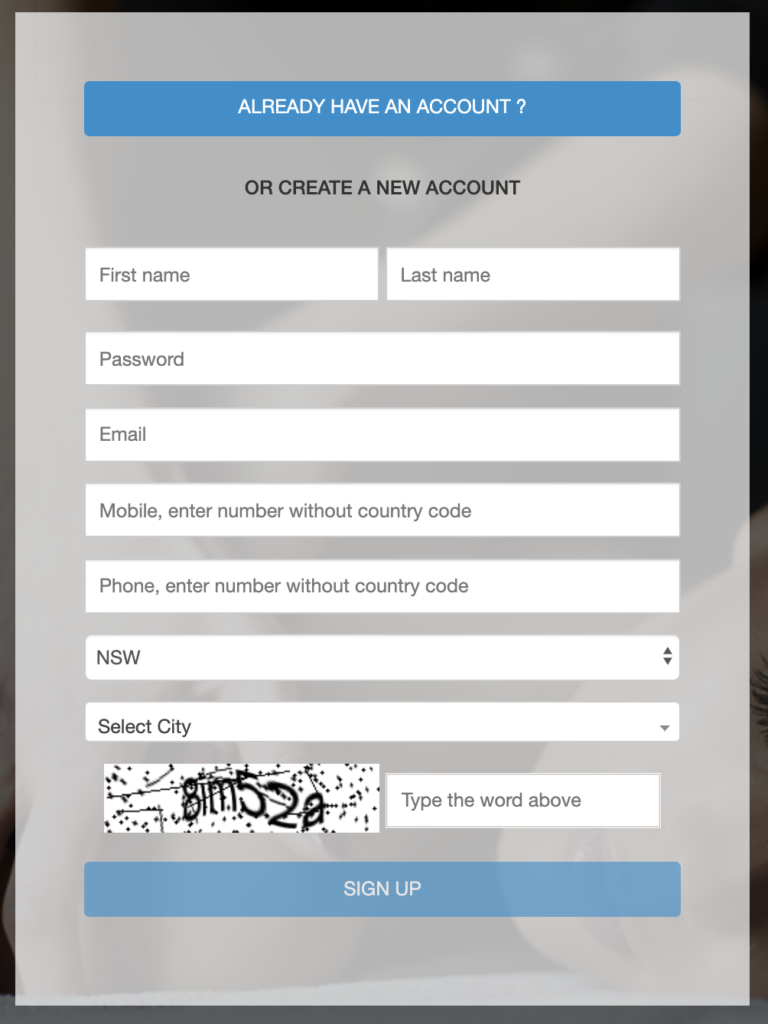
 Potential new fieldworkers can also apply to Zenin directly through their customer portal. The “new recruit” banner can be easily activated and customized in your customer portal settings.

New recruits can create an account and profile, ready to be verified, screened, and activated.
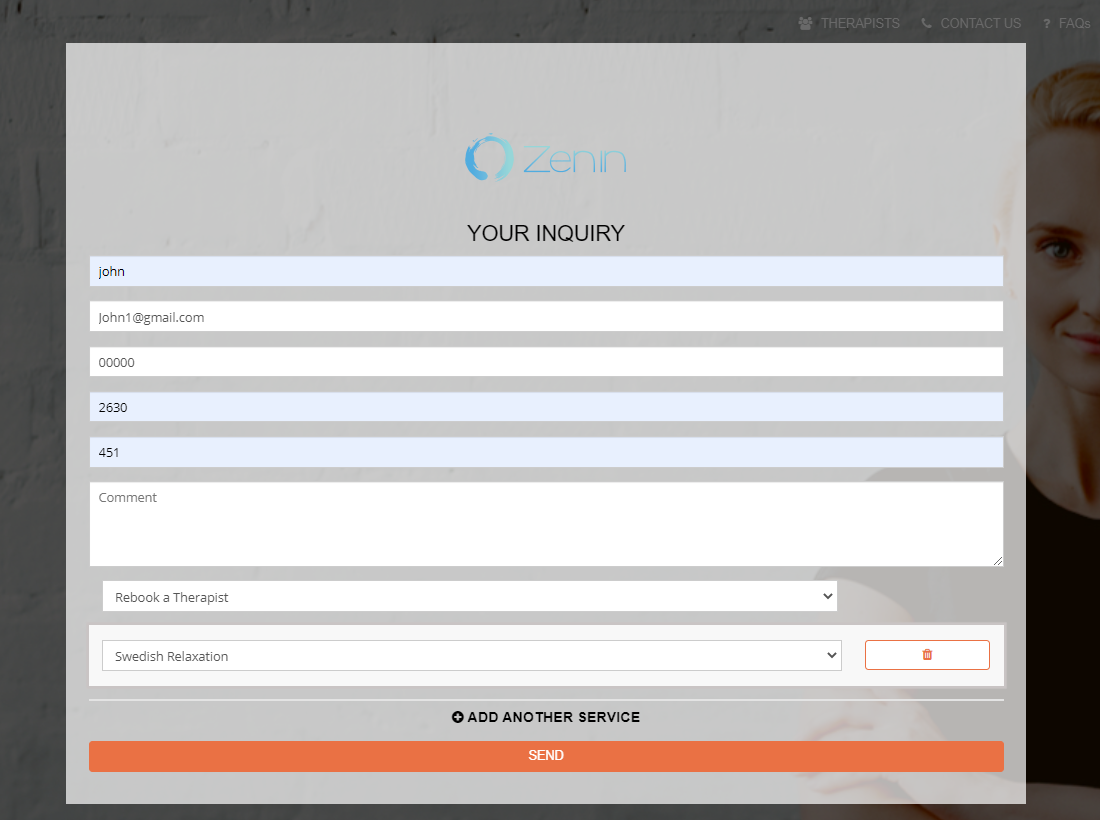
A common feature of most business websites is a contact us form. By selecting the contact us link, we are taken to Zenin’s contact us inquiry form.
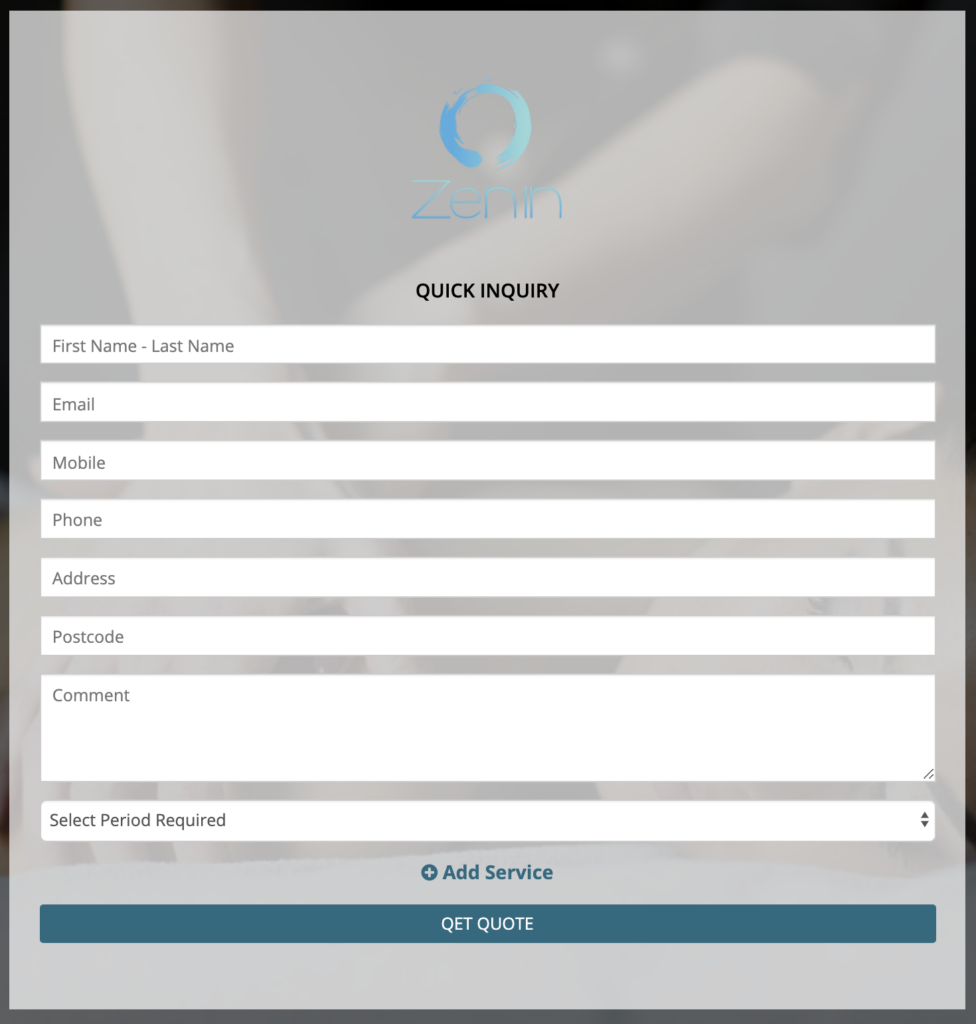
The inquiry form can be displayed on your customer portal and also used as a Contact Us page.
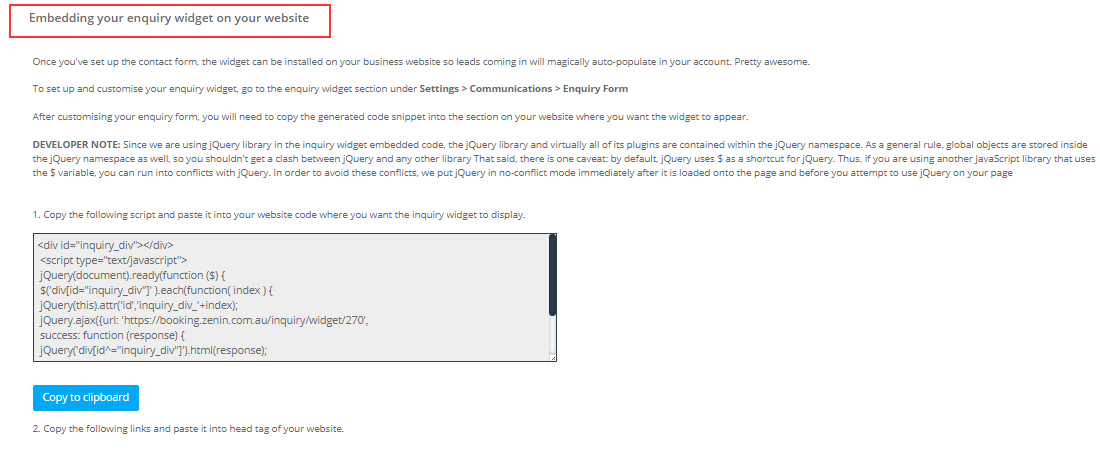
You can embed the inquiry, or contact us form on any page of your website using the inquiry widget feature available under your communication settings.
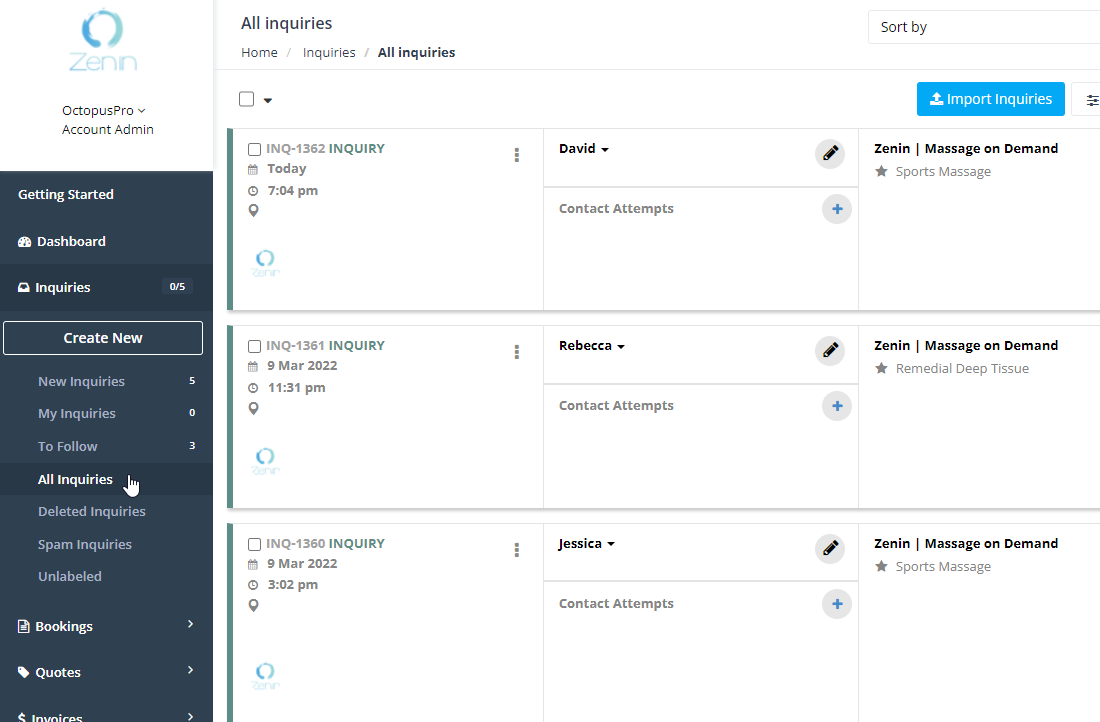
 Once an inquiry is received, your customer will receive an automatic email confirmation, the inquiry can then be easily converted to a quote or booking from the inquiry list or from the inquiry view page.
 Zenin has also used their portal homepage to display marketing videos, top service categories, top services, and a promotional banner for potential new fieldworkers.
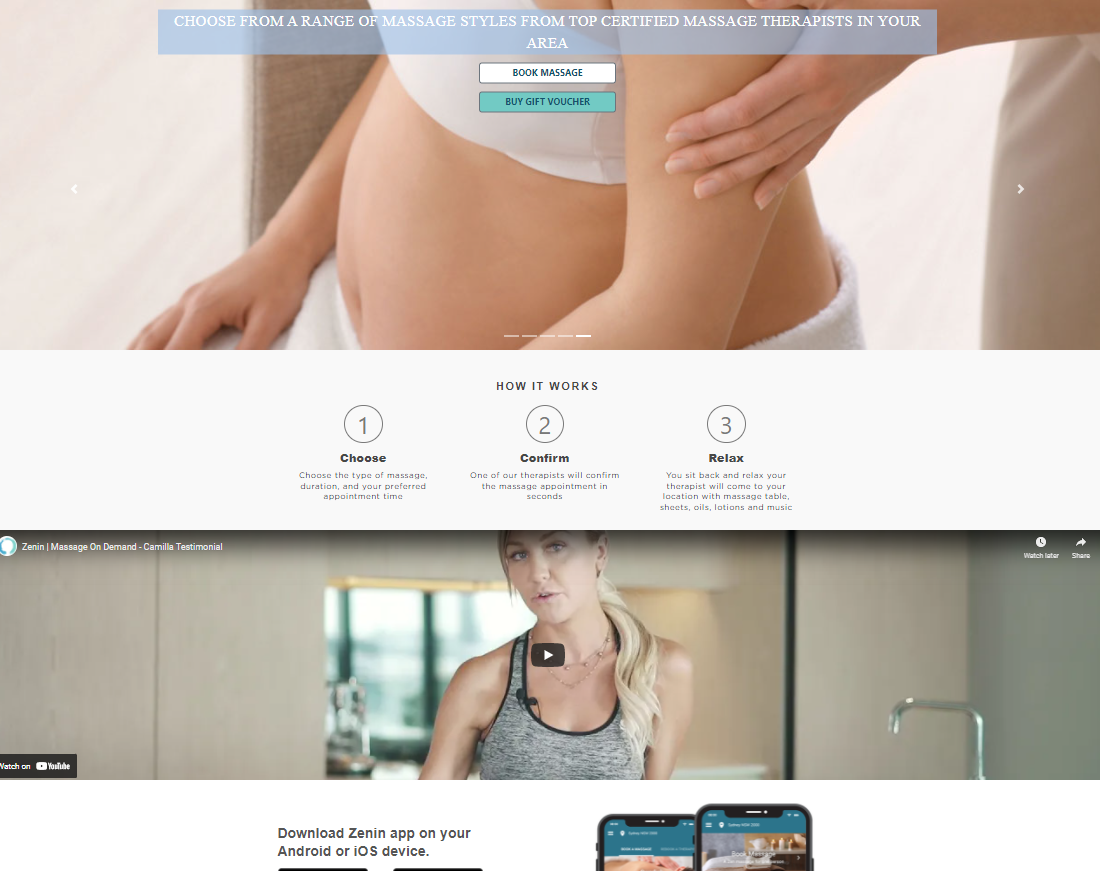
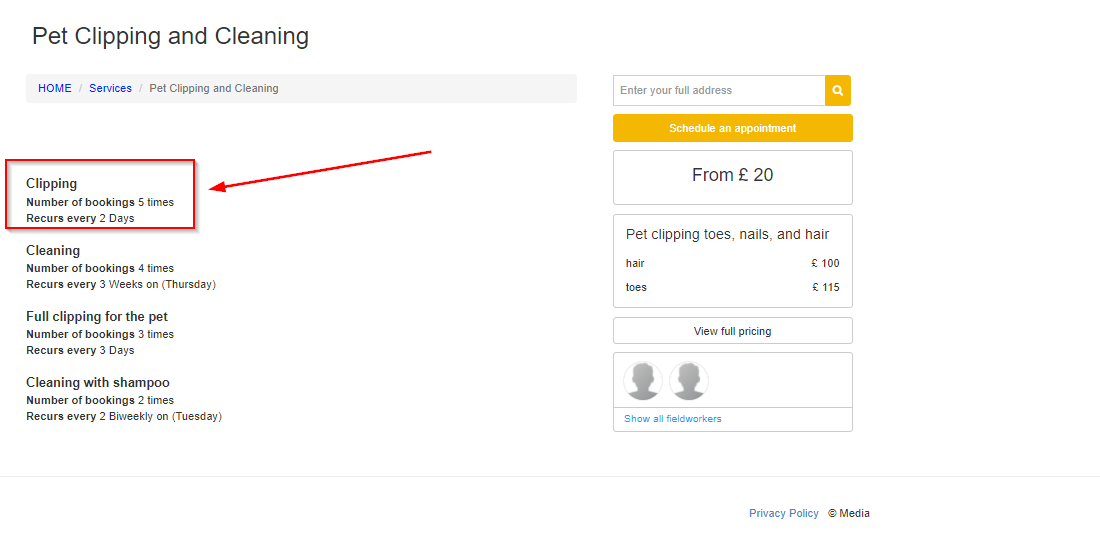
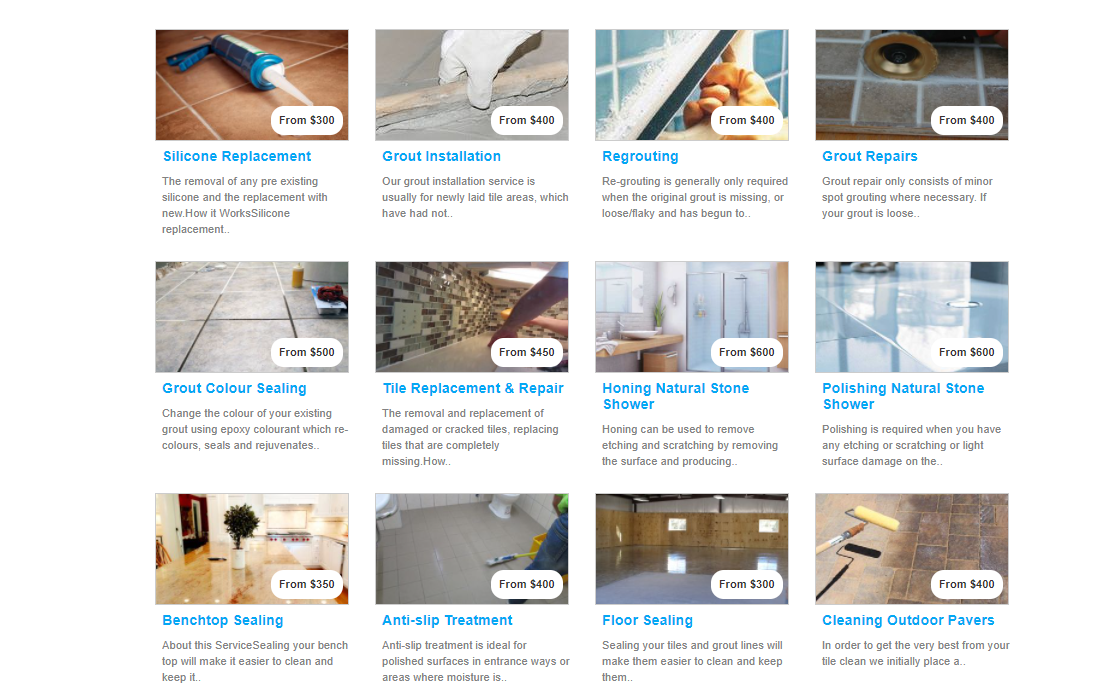
Zenin provides a range of massage services, with the massage types categorized under Couples Massage, Corporate Massage, Booking a Massage, Gift Vouchers, and Re-booking a Therapist.
By categorizing services, customers can find and book the service they need faster instead of having to scroll through a long list.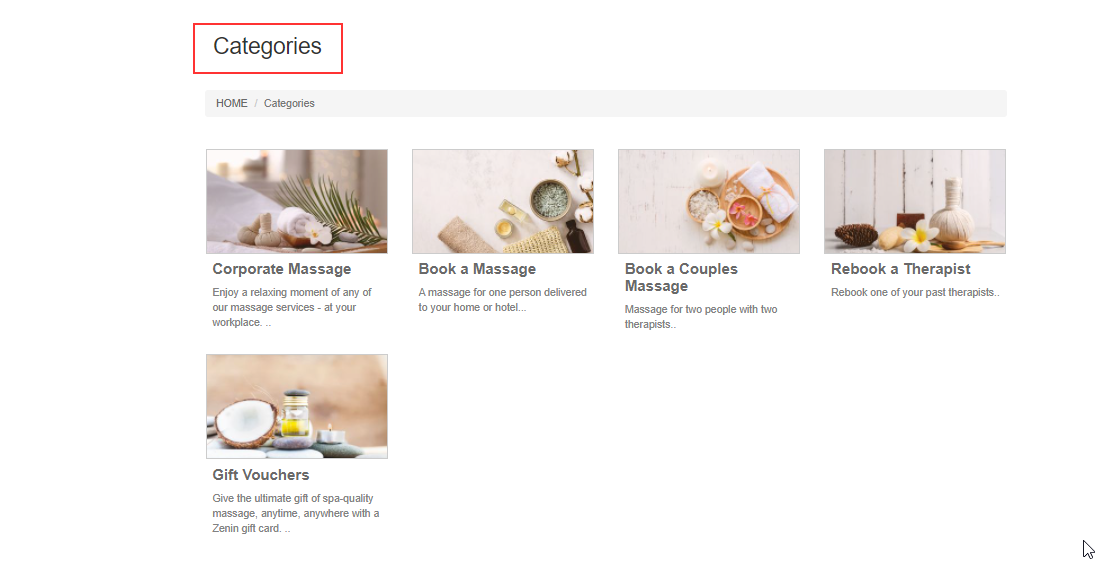
You can add rich images to entice sales and spruce up your services list. It’s easy to upload images and make your services look great.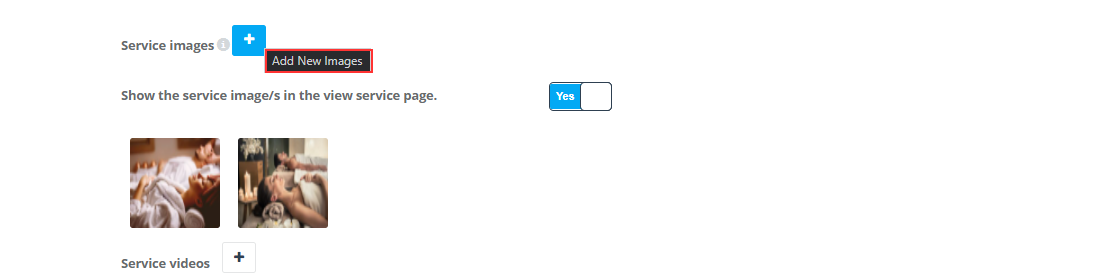
Below the categories list, a list of Zenin’s most popular services is shown.
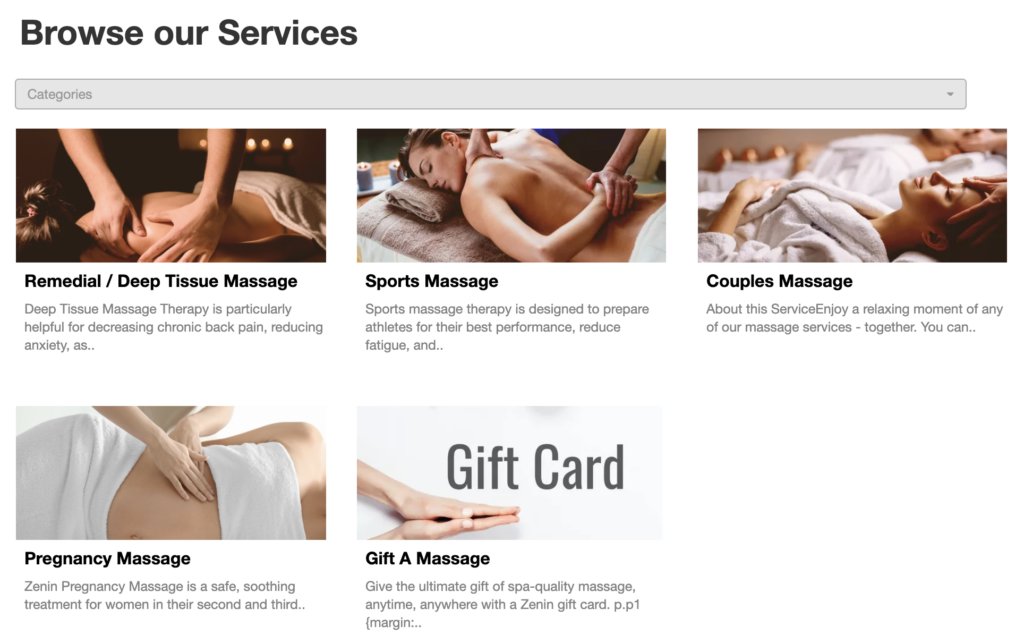
Once a category is selected, the services within that category are displayed; your customers can then begin the booking process by selecting the service they need.

For more information about adding Services and categories, please visit this link.
If your business provides mobile field services, your customers can perform an address search to view the services available in their area prior to starting the booking process.
Now let’s quickly run through the simple booking process together.
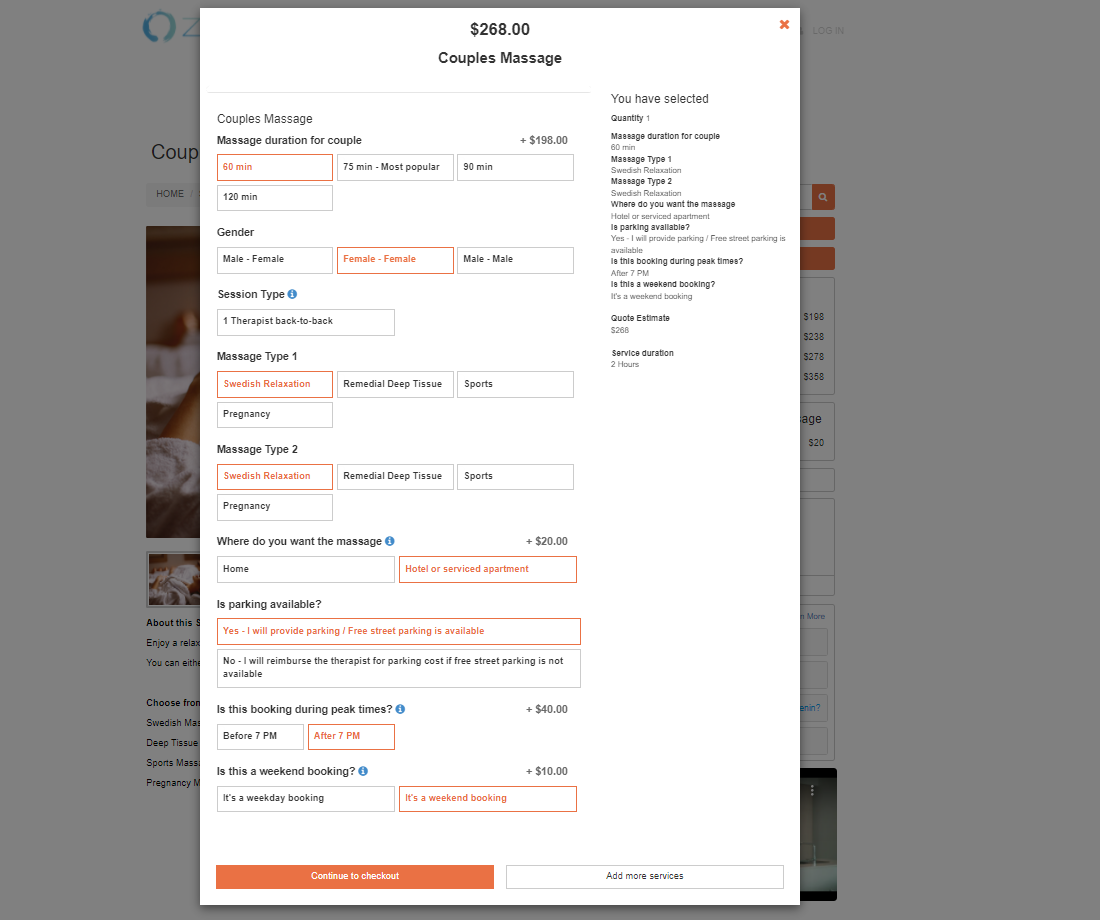
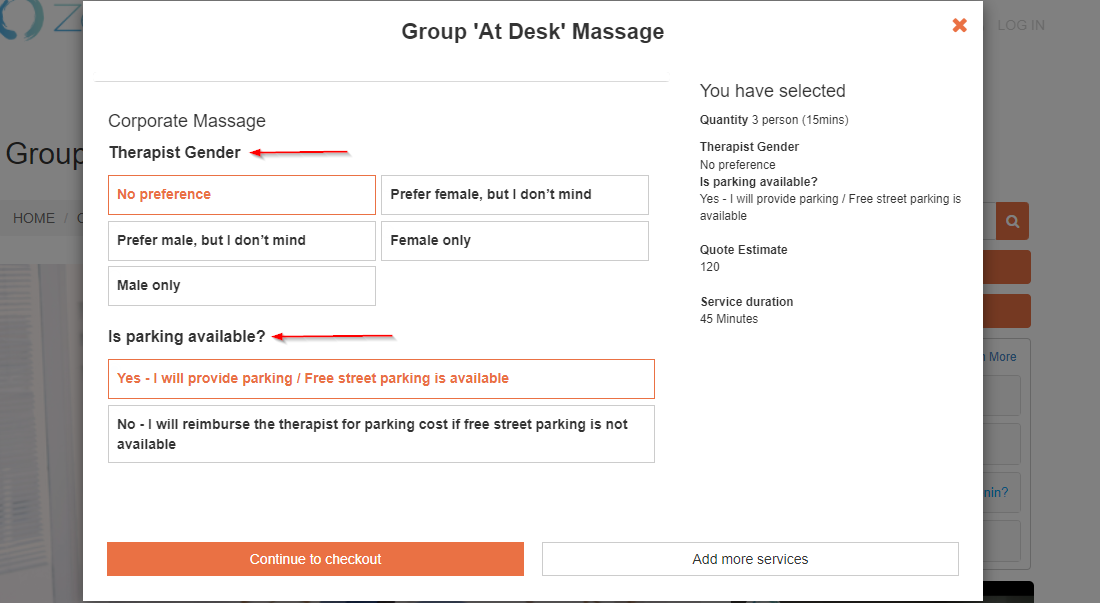
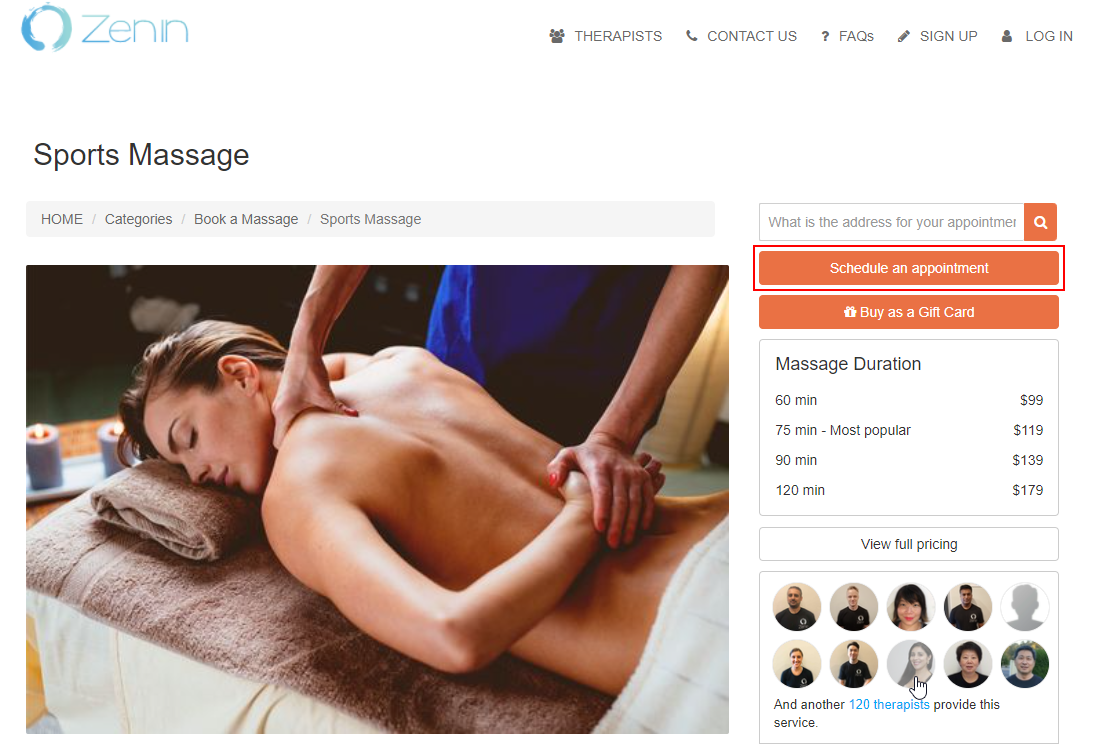
For this example, we’ll book a Zenin couples massage.
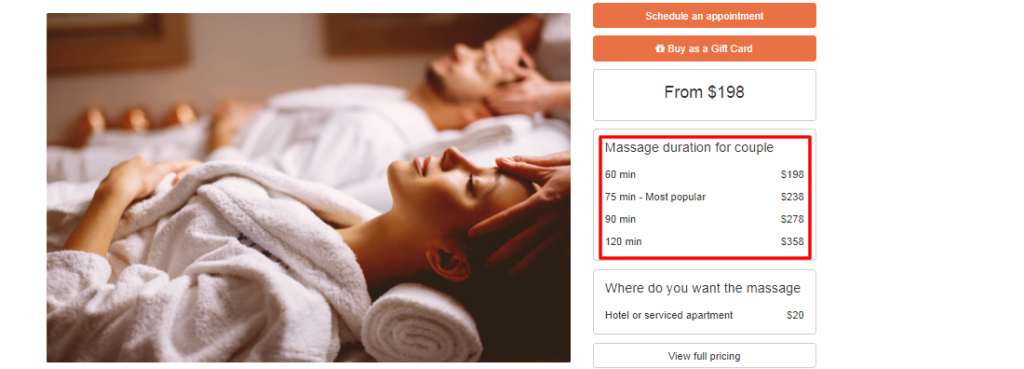
On the services page, you will notice service images and videos, as well as relevant FAQs. You can also show a service pricing breakdown.
To book a service, first, find the service you want, then select Book Service.
 A popup window will then guide you through the custom fields for your selected service.
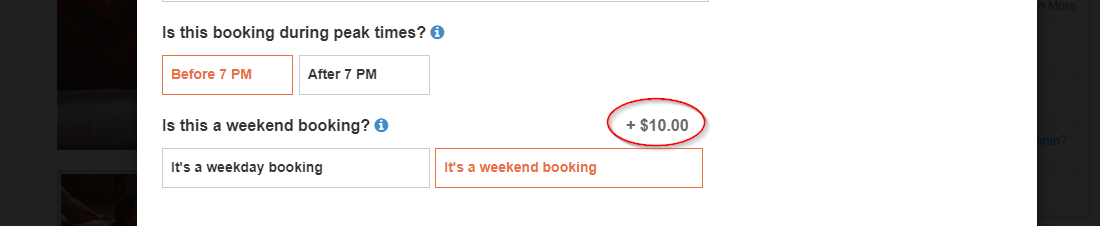
Notice that the pricing is revised as our selection changes. These prices are calculated based on the services settings within your OctopusPro account. 
You will also see that certain custom fields appear and disappear depending on our selection. These are updated through the custom fields dependency feature, and allow you to collect relevant customer information in the most user-friendly way, and only request information from your customers when needed.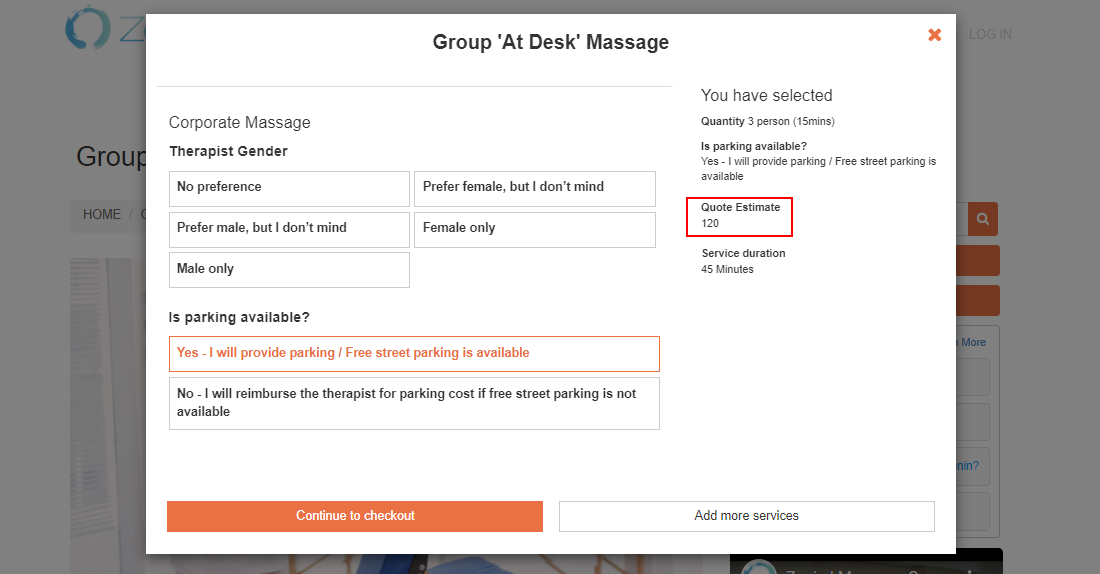
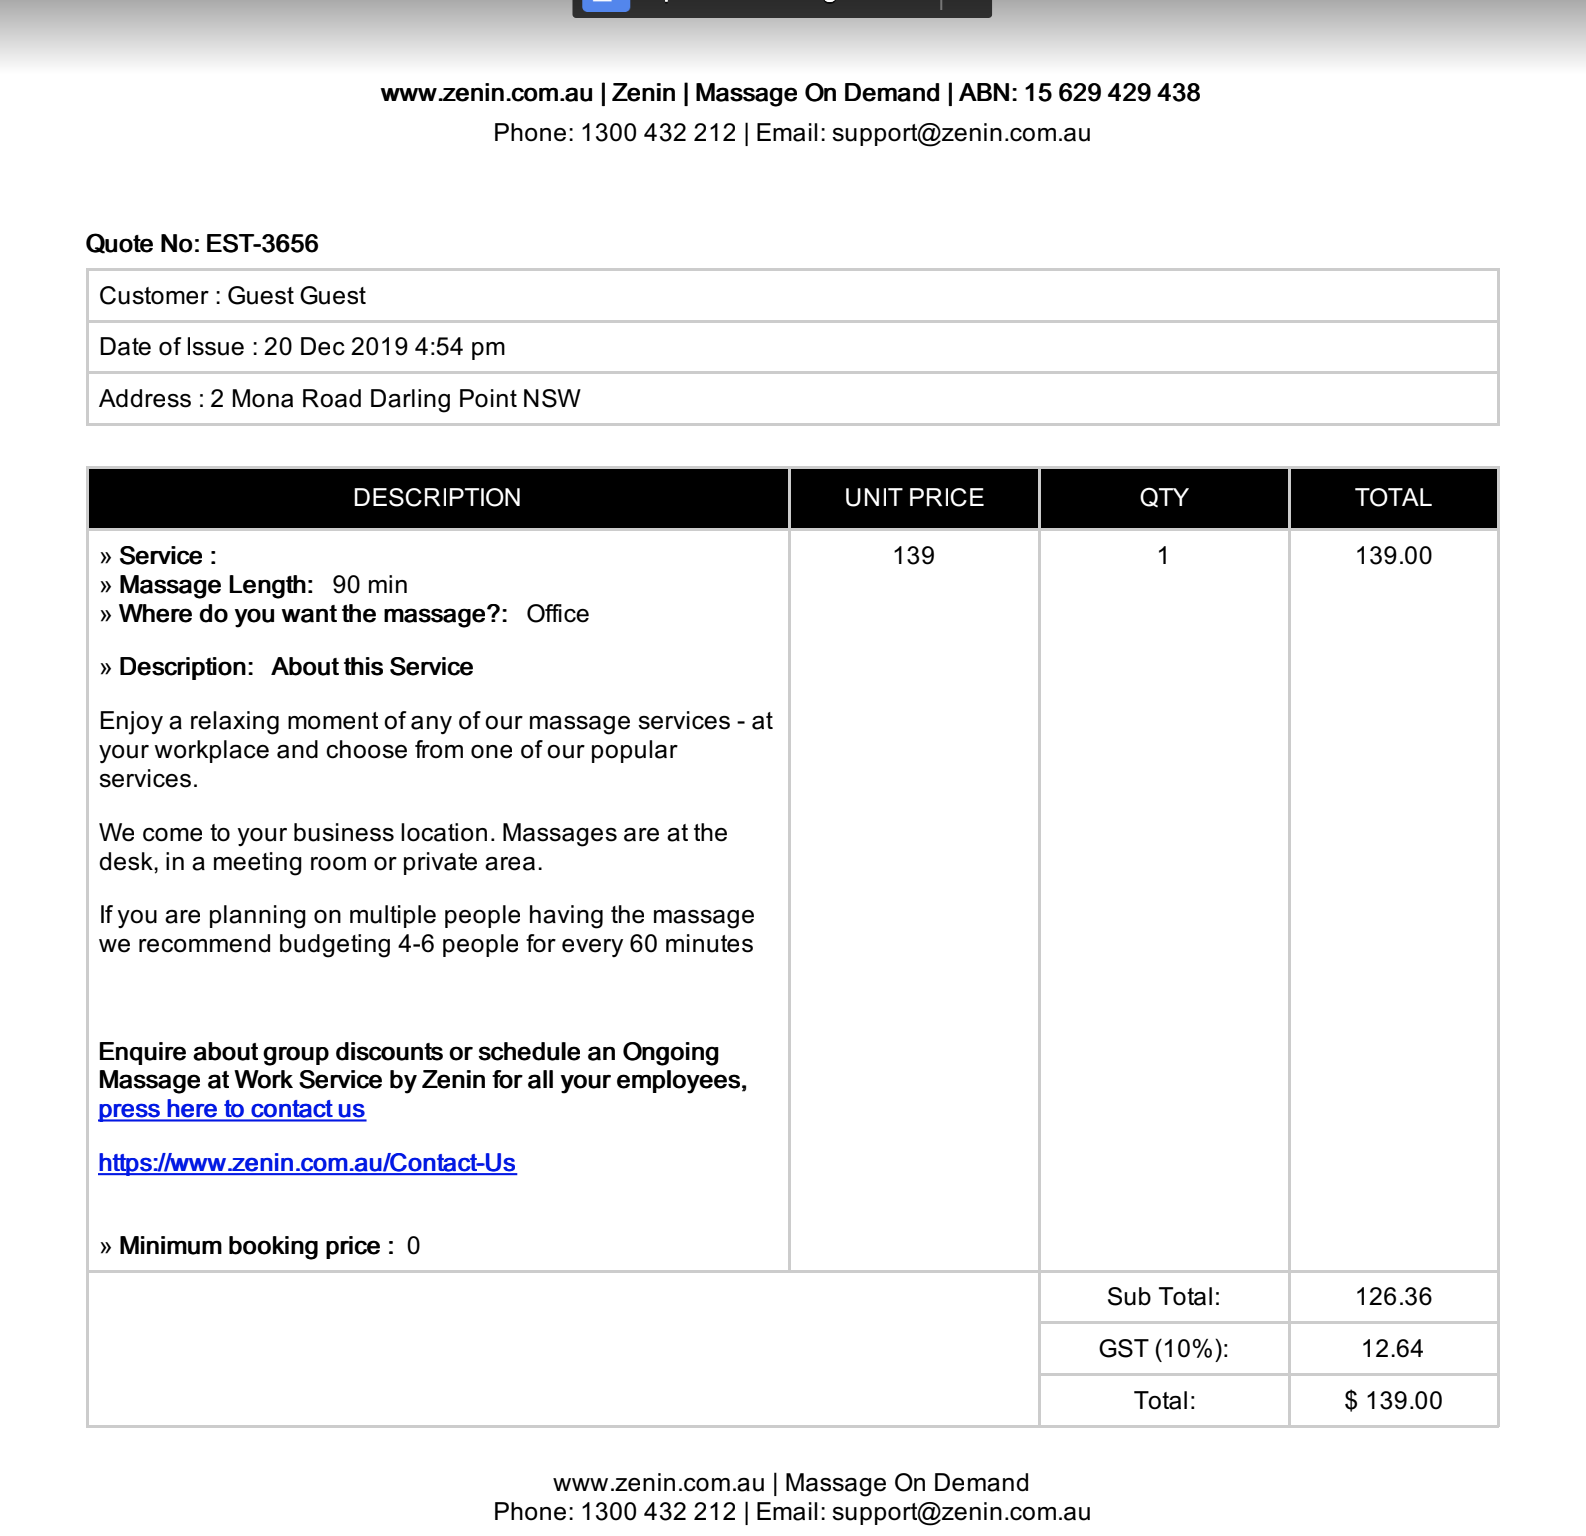
Now at this stage, our quote is complete, and we are given the option to either email the quote to ourselves or go ahead with the booking.
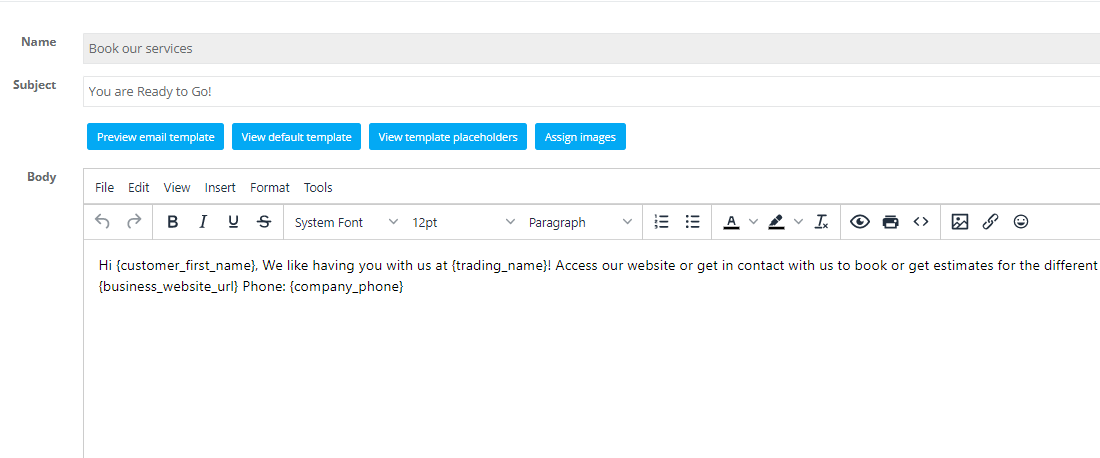
Let’s email the quote and see how it looks.
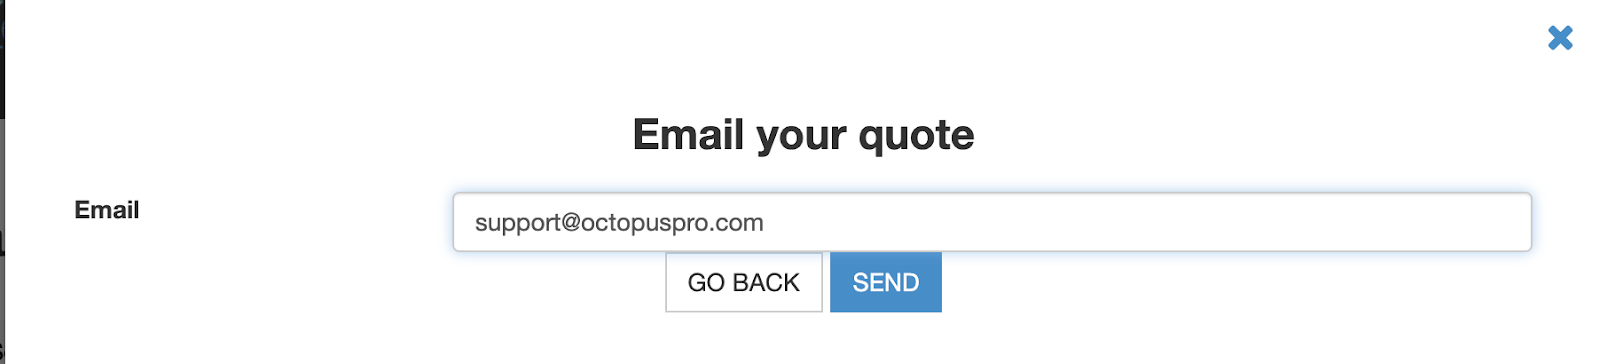 The automated email uses a pre-written OctopusPro template and can be edited within your OctopusPro email template settings.
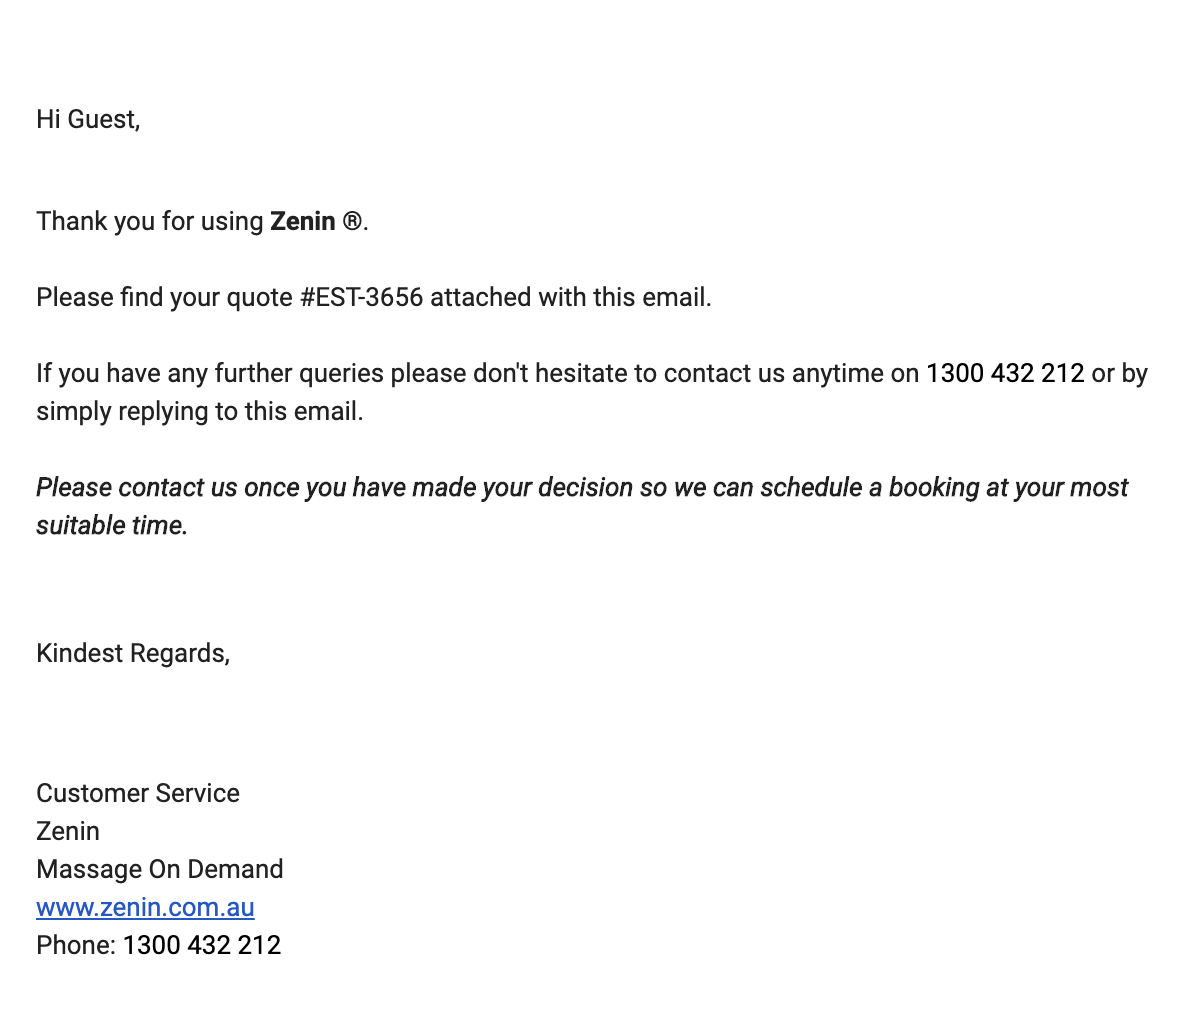
The quote is attached to the email as a PDF, also completely customizable.
You can access email templates by navigating to Settings> General settings> Templates & canned responses

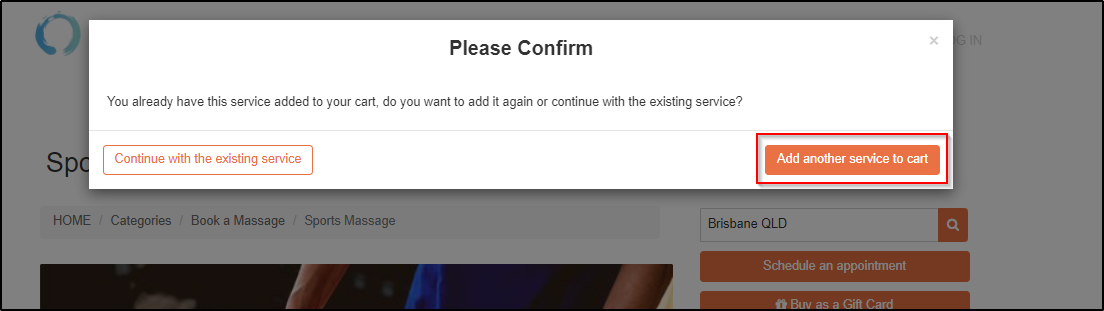
To continue with the booking, select Book Now. Customers will still have the option to add more services if needed.
 You will then be shown calendar availability, where bookings are scheduled based on real-time availability of the Zenin therapists.
OctopusPro will search through the working hours and calendar availability of fieldworkers matching the selected services and display available booking times. Your fieldworkers can log in to the app and manage their availability and working hours at any time.
Customers can also select from a list of preferred fieldworkers available for the selected date and time. This feature can be enabled or disabled depending on your needs.
 The time estimated for the booking is calculated based on your service and custom fields settings and can be easily changed under your services settings.
 Press next to be directed to the customer info popup where we enter our details for the booking.
 If the customer is a member, this will be automatically pre-filled.
You can prompt your customers to upload photos when making bookings through your customer portal by activating the related flag under Flags & Permissions in your customer portal settings. The prompt message can be customized. You can also force your customers to upload photos before being able to confirm their bookings by activating the make uploading photos mandatory flag.
![]()
Once you’ve entered your details, press continues to place a booking, you will then see the booking confirmation screen.
You will receive an email confirmation for your booking, and you can also choose to receive a booking confirmation as an SMS.
Booking reminders will also be sent closer to the scheduled booking time.
Once the booking is created, the Zenin admin receives a new booking notification, and the booking will appear under Tentative bookings in the OctopusPro bookings tab, as well as on the OctopusPro calendar. The booking will remain Tentative until confirmed and assigned to a fieldworker.
 In this example, because Zenin uses the automated job assignment feature, the therapists with matching services, locations and availability will receive a new booking request notification which they can accept or decline.
The job is automatically assigned to the most suitable fieldworker based on specific preferences including rating, distance, date joined, number of jobs completed, and customer satisfaction rate.
Automatic job assignment can be easily enabled or disabled under your general settings.
 When disabled, bookings must be manually assigned. If you are an owner-operator, your bookings will be assigned to your only fieldworker account, the general fieldworker account.
By default, your customers can cancel and reschedule their bookings from their booking confirmation page, as well as from their booking view page in your portal and through the links in the booking confirmation and reminder emails sent to them.
 When rescheduling bookings you can decide whether you want to enable real-time availability and allow them to only book during an available time slot, or disable the real-time availability feature and allow your customers to book for any time during your set working hours without taking existing bookings and blocked events into consideration.
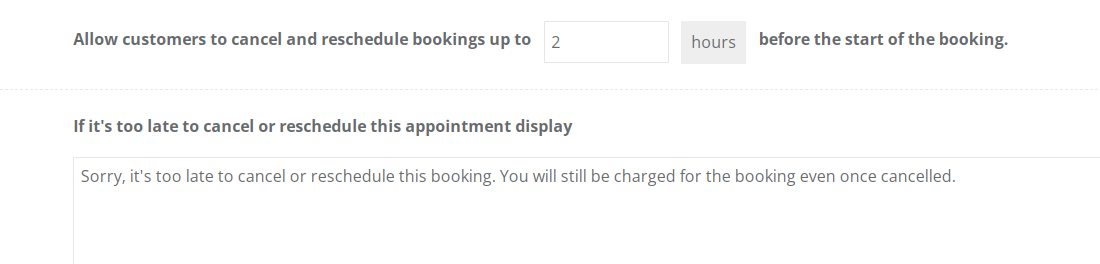
 You can set a minimum time required before canceling by only allowing customers to cancel and reschedule bookings up to a set number of hours before the start time of their bookings. You can set a custom message to display to your customers when trying to cancel or reschedule their appointments after the minimum time required has passed.
 If you don’t want to allow your customers to cancel or reschedule through your portal you can disable this feature from your customer portal settings and remove the cancel and reschedule links from your email confirmation and reminder email templates under Settings > Communications.
 Customers can choose to sign up for a Zenin account using the OctopusPro customer portal and self-manage their bookings, payments, and profile. Creating an account is secure, and makes placing future bookings fast and easy. Customers can log in using their phone or tablet to access their jobs and transactions at any time.
Customers can reschedule or cancel bookings, communicate with the office and therapist, leave feedback and reviews, and pay invoices. Customers can also view a complete booking history and manage recurring bookings.
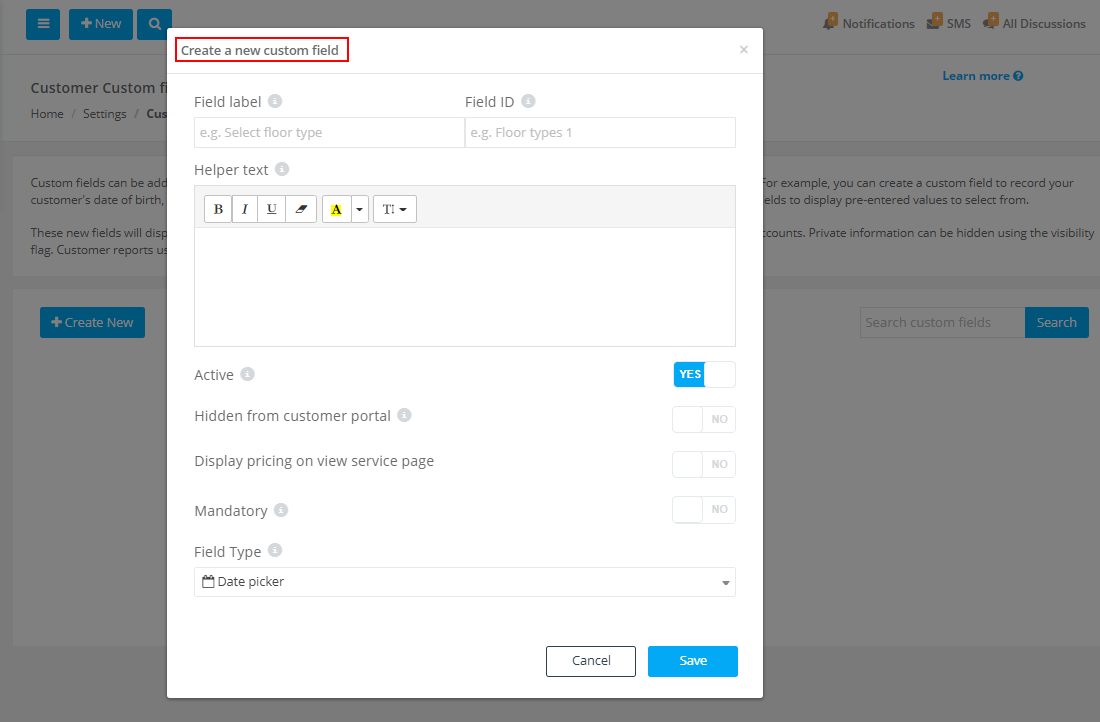
Custom fields can be added to your customer profiles to record any information that is not included in the standard customer profile. For example, you can create a custom field to record your customer’s date of birth, gender, hobbies, interests, height, or any other helpful information specific to your industry. You can set the fields to display pre-entered values to select from.
These new fields will display in your customer profile and can be edited by your team and by your customers when logged in to their accounts. Private information can be hidden using the visibility flag. Customer reports using this information can be generated for your sales or marketing teams.
 If your business provides services for dependents, such as vehicles, children, or pets rather than to the customers themselves, the customer properties feature can be used to create profiles for those your customers make bookings for.
Let’s look at this example from Pet Playtime, where they have created a dog profile. We can see the fields created are the Dog’s Name, Photo, Gender, Date of Birth, Breed (purebred/mixed), Primary Breed, Secondary Breed, Size, and Weight. Now each time a customer is making a booking or signing up, they will be prompted to include a profile or select an existing profile. So it’s clear who or what the job is for. This enables you to break down all bookings, in this case by dog, and view the booking or service history for each dog. This becomes increasingly useful with customers which (for example) have multiple pets and are required to maintain services and billing history.
If you have created a customer property while adding a new booking a new field will appear listing all pre-entered properties related to the customer for the person making the booking to select from.
Customer properties appear in customer profiles, booking forms, and the customer portal. Your customers can add new properties to their accounts themselves and make bookings for these properties.
This feature is really helpful in many industries including Automotive, Childcare, Pet Care, Care Givers, Appliance Repairs, or any business where customers have sub-customers, properties, or assets you carry out work for.
For more information about customer properties please check our user guide.
You can also remove potential friction points from the booking process by enabling customers to repeat past orders with a single click. All they need to do is open their booking history and select re-book.
If you don’t have an OctopusPro account, sign up today and get a free 14 days trial at OctopusPro.com.
See examples and read more about the Customer Portal here
For any questions, you have please email us at [email protected]